You probably don’t notice anything different, but I have switched Web hosts. MediaTemple was acquired by GoDaddy and very quickly their service turned to crap. GoDaddy incessantly tries to up-sell stuff and they charge for just about everything you can get for free anywhere else. Most annoyingly, they phased out unlimited e-mail addresses that MediaTemple would always offer. GoDaddy sucks. Avoid them like the plague. Giving Namecheap a try and so far they’ve been great.
Also: I’m just now discovering that many of my beloved em-dashes were converted into curly-apostrophes when I migrated off of drupal. This will require a post-by-post search of the database with some clever regex tokens.
Wood engraving is a very unforgiving process. There’s no (easy) way to erase mistakes. We don’t have an undo function like you digital nerds with your iPads. Planning and preparatory drawings are the key to fixing mistakes before they are permanently cut into your block.
Good. You’ve done the work and have that perfectly composed drawing that’s going to put you in all the art history books. Mr. Picasso, the Louvre-er-rah is on live four. The problem now becomes: how do you get that drawing on to your end-grain engraving block?
The simplest method is to trace your design to the block placing some transfer paper between the drawing and the block. The biggest drawback to this is that it is repetitive and time-consuming. Welcome to the world of printmaking! I also find that the transferred lines will eventually rub off if you don’t spray them with fixatif. This problem doubles if you are using any sort of slippery plastic engraving material like resingrave or corian. Transfer paper is usually best if you want to get a general layout of your design without too much detail, allowing the detail to emerge through the engraving process.
If you want a very accurate transfer of your drawing I have found that the best method is to use heat to transfer a LASER printed scan of your drawing.
Let’s take a moment to ruminate on fact that LASER is an acronym for “Light Amplification by Stimulated Emission of Radiation.” What this has to do with the such-named printers and this post in general is beyond my understanding. All I know is that I, like the grammar pro that I am, am going to all-caps LASER whenever I use it.
Many sources on the ‘net will advise you to use acetone to transfer toner-based images. This sorta works, but in my experience it has a 70% failure rate. The key to getting a good toner transfer is heat. The source of that heat is a Wall Lenk L16TT Transfer Tool. It’s like a soldering iron with a disc attached to the end.
Print out your drawing (or photocopy it) and attach it, face-down, to your block. You want to be able to peek at the surface as you work, but it should be secure enough that it doesn’t shift around as you work. Heat up your transfer tool and then meticulously apply heat to the back of the printout. I drew a grid on the back of mine so that I could keep track of the areas I had worked on. You can lift the paper and peek at the results as you move across the block. It will take time and a lot more heat than you think. I was always hesitant to use this method on resingrave because I feared melting the epoxy.
Once you’ve covered the entire surface with burnished heat, you can start peeling back the paper. It will adhere more than you want and this is where acetone comes in handy. Don’t just rip the paper off, dab some acetone on the trouble spots and slowly work the paper off. If you are too hasty, paper scraps will be glued to your block. You will find that large areas of black adhere the most. For that reason, you should probably edit out large black areas on your image scan before attempting to transfer.
If all has gone well, your drawing will now appear in reverse on your block. Note that the toner will have a slight, raised texture. You can wash off the excess before printing with an acetone dampened swab if you want. Don’t let too much liquid get on the wood. You don’t want to raise the grain.
So here’s a quick video I made documenting the process:
Remember, the best wood engravings aren’t just mechanical reproductions of drawings. Let your tools and cutting guide the final appearance of your print. Get hip kids! Formschneider (cutting around a completed line drawing) is for losers and 16th century renaissance masters only!
If you have any questions, leave a comment and I will try to answer the best I can.
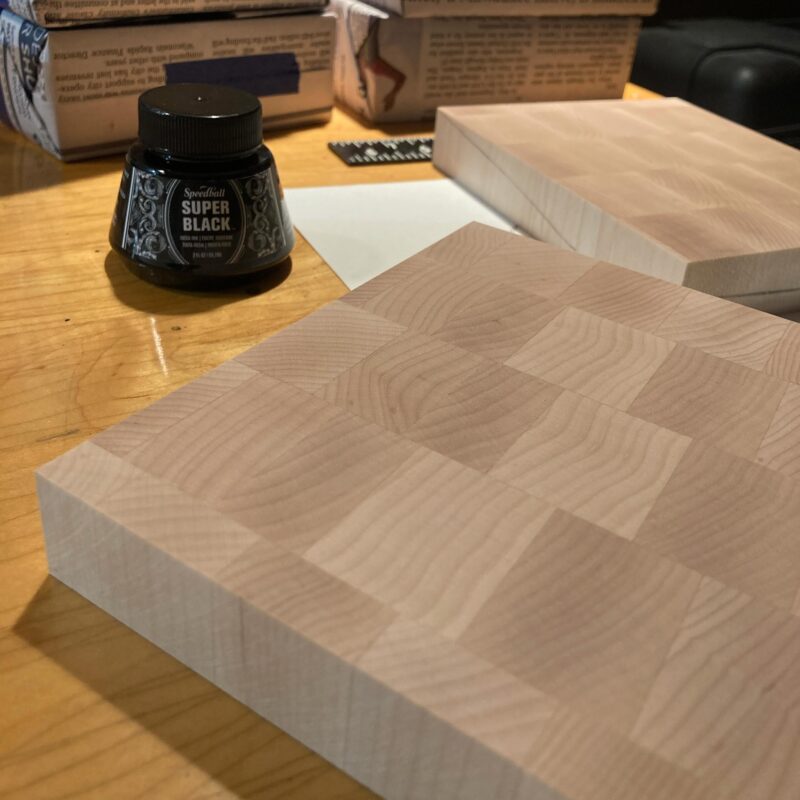
It’s been quite a while since I have engraved in proper end-grain wood blocks. Up until now I have been very happy using resingrave but, alas, that material is not being manufactured anymore. I’ve spent the past year or so trying to find a suitable alternative. Corian countertop material allows for very fine lines but is chalky and gross to cut into. Boxwood or lemonwood would be great, but they are not available here in the good old U.S.A. and can get very expensive to have them imported from England. I even started to consider making my own maple blocks but I fear table saws and really wouldn’t know what I was doing. Then, a few months ago, I found out that there has been a block maker right here in the Midwest for years. So, here we are, with a fresh stack of large end-grain maple blocks ready to go. I have a couple of ideas and will hopefully have something to show in a month or so. Stay tuned.
I just made a pretty significant update to the site’s main navigation. Finally, I am using a more mobile-friendly menu system in which the various depths slide left and right as you drill down. This article about WordPress menu walkers was extremely helpful in getting all this to work correctly.
I probably should add a bunch of accessibility attributes, but that is a bit much for now. I’m just shocked the thing works.
While playing Fallout 4 I ran into this glitch that ruined my completion of the “Destroy the Brotherhood” quest. After triggering the explosion on the blimp the escape helicopter left me stranded in midair allowing the ground defenses to murder me in the sky:
The past week or so I have spent a bunch of time working behind-the-scenes on this WordPress site. My first priority was getting a handle on the new-ish system for creating and displaying sidebar blocks. Since WordPress 5.0, the goal of each subsequent update has been to make as much of the backend operate like the Gutenberg editor. When that change came to the widgets interface it ended up conflicting with a number of plugins that I was using: mainly contextual widget display and the sidebar nav. The side-nav is gone, and now I am using logic within my theme files to determine which sidebar items get displayed. So far it all seems to be working.
My next big change was to clean-up and consolidate my CSS so that I could use a single template to render the various content types on this site. In the process I have re-added a few pages that I had created in Views back on the old Drupal version of this site. Art and Retro-Computing feeds are back. Many of the reviews pages now have alternateviews.
I fixed a bunch of little details all over the place and have made it so my artworks exist apart from my posts (even though they are in this main home page feed). The final change which I have yet to get to is making the navigation more mobile friendly. I never look at the Web on my phone, so this is low-priority for me.
Best of 2021!!! Honestly, I didn’t buy enough music in 2021 to warrant a top 10 list but here’s what I got:
6. Gazelle Twin & NYX “Deep England” – What if your high school choral group was composed of a bunch of crystal worshiping hipsters? They would record covers of songs from “The Wicker Man” of course! That and a few Gazelle Twin traxxx.
5. “PAURA: A Collection Of Italian Horror Sounds From The CAM Sugar Archive” – A wonderful compilation of Italian horror and giallo music. I already own about half of these songs but this collection is great.
4. Cabaret Voltaire “Shadow of Funk” – Richard H. Kirk decided to bring back Cabaret Voltaire in a big way… then he died. He also released two records of 40 minute drones. This was better.
3. Jacob Haage & Sarah Assbring “Riptide” – Sarah Assbring is also known as El Perro Del Mar. I thought that “Free Land” was released this year. It wasn’t. If it was, it would be my #1. Instead I have to settle with this artsy soundtrack to a Momenshantz wannabe dance troupe.
2. Dame Area “Ondas Tribales” – They are literally the first band ever to realize their drum machine also has conga patches. It’s a fact. This is basically tribal beats with a woman screaming in Spanish, Italian, or some other shithole country’s language that I don’t understand. In any event it’s awesome.
1. Hannah Peel “Fir Wave” – Hannah Peel learned about synths and stuff from being John Foxx’s violinist and backup vocalist in The Maths. This record is based on samples of Delia Derbyshire’s music. Yeah, I didn’t know who she was either, but then again, I couldn’t care less about Dr. Who. In any event, this is another epic sonic journey in the vein of her last record, “Mary Casio: Journey To Cassiopeia.”
A pandemic ago I decided to heed the warnings on the Apple ][ Facebook group and remove the 30-year-old battery from my Apple IIgs computer. This is harder than it should be since Apple thought it was a good idea to permanently attach this ticking time bomb to the motherboard. My solution was to clip out the old battery and solder in a plastic battery holder instead. This is not that hard to do, but I am a complete klutz when it comes to soldering. Destroy the motherboard with a mountain of silvery metal was always a possible outcome. I documented the process and present it here. Originally I had intended to do a hilariously comic narration over the video but I eventually came to my senses. Enjoy the video, video enjoyers:
Hey everybody, did you know today is election day? I hadn’t seen any reminders on social media at all so I thought I’d just let you know here. Remember, post a photo of yourself holding a sticker because voting is not just an expressive act, it is also a performative one!
I have been using my new WordPress site for about a month now and can say that I am very satisfied with how everything is working. So much so that I would really like to convert all my sites to WordPress, if not for the fact that hand migration process from Drupal was a horrible pain.
The Good
WordPress is much faster than Drupal. Even without a caching plugin I am seeing my pages load up super quick. With the cache enabled—which, as an editor, I don’t actually see—the pages load almost instantaneously.
The Gutenberg editing interface takes a little getting used to, but works very well especially with the addition of the EditorsKit plugin. Adding images and media like YouTube embeds or audio files is completely hassle/code free. The EditorsKit plugin adds in the all important Insert Special Character function and a few other less common HTML tags like `abbr`.
Askimet provides spam-blocking that actually works. Drupal used to have a great anti-spam service in Mollum, but that was unceremoniously discontinued and the floodgates of spam opened up. In a related note, WordPress comment moderation is very simple and clean and, for the time being, I actually like seeing pingbacks
With the right plugins, creating custom content isn’t as bad as I originally thought. I had to pay for the unlimited install Advanced Custom Fields plugin, but, between this site and my work projects, it has been well worth the investment.
Finally, as I have stated before, updating the site is a complete breeze. This was my main reason for making the switch to WordPress. Click a button and the WordPress core is updated! The latest version allows me to tell the system to install updates automatically based on a per-plugin setting. Coming from Drupal, this is life changing.
The Bad
It’s not all hearts and rainbows here in WordPressland. There are still a few areas that could use some improvement. First and foremost is that lack of anything like Drupal Views. Views allows front-end users to display site content in any manner they can imagine without needing to touch a single line of code. Instead, I am stuck having to hand code queries into WordPress PHP template files. The query code is relatively easy to learn but every little tweak you want to make requires hours of combing through help forums and documentation for an answer. I still have no idea how to add filters to my various Reviews lists. In Views you just expose a filter and poof you have a dropdown or a field that visitors can use to narrow down a list.
I’m sure there is a plugin for this, but I would want to set up automated backups of the site. The WP All-in-One Migration plugin makes backing up easy, but I can figure out a way of making it run on a schedule.
While the front-end of the Media Library is excellent, WordPress is constantly creating unnecessary image copies of every image I upload, regardless of context. This means there’s a lot of unused junk in my uploads directory. It’s not horrible, but my Internet ’98 mentality wants me so save as much hard drive space as possible.
Most of my other complaints are about things that could be accomplished with a module in Drupal but require PHP coding to do in WordPress. Off the top of my head: highlighting a menu-trail based on a content type, customizing RSS output, custom menu blocks, etc.