A pandemic ago I decided to heed the warnings on the Apple ][ Facebook group and remove the 30-year-old battery from my Apple IIgs computer. This is harder than it should be since Apple thought it was a good idea to permanently attach this ticking time bomb to the motherboard. My solution was to clip out the old battery and solder in a plastic battery holder instead. This is not that hard to do, but I am a complete klutz when it comes to soldering. Destroy the motherboard with a mountain of silvery metal was always a possible outcome. I documented the process and present it here. Originally I had intended to do a hilariously comic narration over the video but I eventually came to my senses. Enjoy the video, video enjoyers:
I recently took the time to sample all of the default sounds from the Apple IIgs music composition program The Music Studio for use with my new sampler. The sounds were recorded directly out of my IIgs via an Applied Engineering sound card and into the Octatrack. I then took the WAV files into my PC and cleaned up the audio a bit. The IIgs outputs a rather noisy signal.
The samples are organized into four sets: Jazz, Rock, Classical and Voices. Each set has about fifteen instruments and each instrument was sampled at six octaves of C. Jazz also contains a couple drum kits which I broke apart and sliced into eight notes each. I tried to create nice evenly sliced sample chains but they are a tad off so they require a little manual tweaking after auto-slicing them.
The Music Studio was one of the first music composition programs I ever used. Certainly, it was the best one I had used up until that time. Technically, the first would have been Will Harvey’s Music Construction Set on the Apple ][+ with a Mockingboard sound card, but I don’t think any of my compositions from that program have survived (I’ll have to dig around my old disks one of these days). Fortunately(?), my IIgs compositions have survived and have been imaged and archived. Now such classics as “Kill Your Mama” and “Robert is Coll” have been preserved for the ages. Most of what we did in The Music Studio was transcribe my brother’s heavy metal guitar tab sheet music. So there’s a lot of G’n’R and Metallica riffs.
What made the program so cool (or “coll” if your are my typo prone teen aged self) was the inclusion of drum sounds. In hindsight, really bad drum sounds but drums nonetheless. It was my first real go at creating electronic music. I had no idea how performers like Cabaret Voltaire or even Devo were able to program their keyboards to play music automatically. There was that Jan Hammer Miami Vice video where you actually got a glimpse of a computerized rig (probably a Fairlight or something else that cost more than a car) and this seemed about as close to that as I could ever get.
Unfortunately, The Music Studio had a lot of quirks that made it really difficult to use. Although it uses a standard music staff for notation, it really plays notes like a piano roll. Meaning, if you have a whole note you want to ring out under several quarter notes you have to insert a bunch of redundant looking rests above the whole note. Otherwise, it plays the entirety of that long note before playing the quarter notes that are after it. Confusing, yes. Practically speaking, what this means for the composer is they have to put a bunch of evenly spaced rests across the top of the song scroll to insure the play head keeps moving along. The other major limitation is that you can’t have two instruments play the same note at the same time. That made any sort of complex arrangement a matter of spacing instruments across the staff all while avoiding your kludge of rests.
Until I was exposed to MOD files and tracking software on my PC this is how I thought music was made on a computer. Even Q-Bob’s music was created using a similar looking MIDI composition program. FastTracker and MadTracker freed me of this notion and from there on I began to make music more in line with what I wanted to do as a teen.
The Music Studio did have a very recognizable sound though. If you ever played Dream Zone you know exactly what I mean. These samples now allow us to get some of that distinctive sound into modern music apps and hardware. So, use the link at the bottom to download the set for yourself. In the meantime, here’s the first composition I made using the samples:
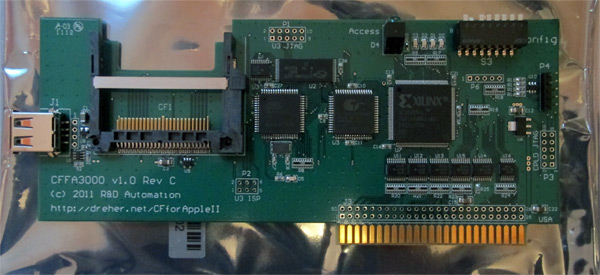
CFFA3000 is an expansion card for the Apple 2 series of computers that allows you to use a standard USB flash stick or compact flash card as a storage media for all your Apple ][ disk images. Now you can take a standard Apple disk image, such as a .2MG, .DSK or .PO file, and save it to a USB stick. The USB stick can then be plugged into the CFFA3000, and, with a few settings tweaks, you can boot that disk image on your original Apple ][ hardware. Really cool!
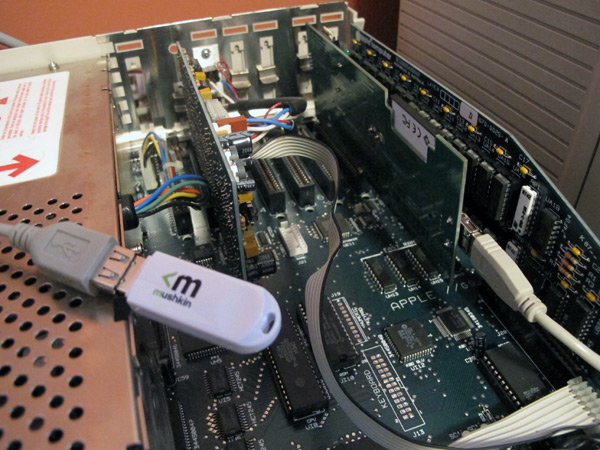
Installing the card is just a matter of opening the Apple ][, and inserting the card into an empty slot (I used slot 7). I hooked up a short USB extension cable to the card which allows me to swap out a USB stick without having to open up the computer case. The CFFA3000 even allows you to swap out the flash memory while the computer is up and running. I also have a compact flash card directly plugged in to the card. I have put a few essentials like system software and utilities on that card, but the set up program allows me to pull disk images from both the USB and compact flash at the same time.
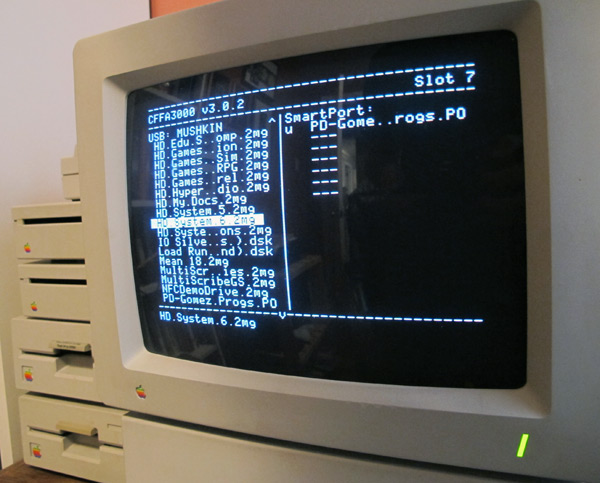
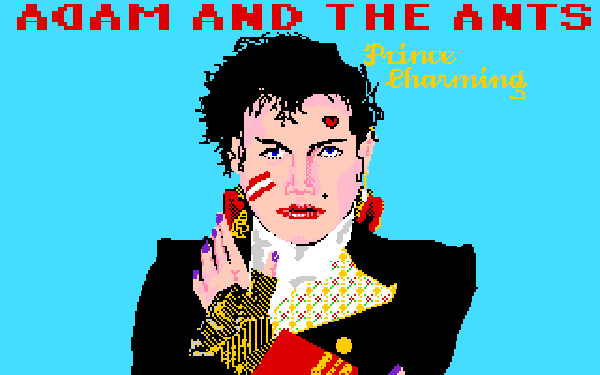
Disk images are mounted from a simple and intuitive menu system that is access via the IIgs control panel access screen. For the first time ever I have been able to run System 6 without having constantly to swap disks (I never owned a hard drive for my IIgs) and it only takes seconds to boot up. Booting system software from a floppy literally used to take minutes for me. 32MB disk images are easily created and can be use to then store all my documents like this kick ass Paintworks drawing I did of Adam Ant:
The CFFA3000 is not only about IIgs software. It can also can be used to mount and run disk images of 5.25″ floppies. Now I can Lode Runner and Alpha Plot without worrying about the fragile disk media getting eaten alive by my ancient disk drives. This isn’t perfect. I have noticed that one of my favorite Apple games of all time, Beyond Castle Wolfenstein, does not work when running off of the card (same disk image runs fine from booted from a floppy in the real drive).
One additional benefit is that the CFFA3000 makes it dead simple to rip physical disks, 3.5″ or 5.25″, into disk images for use on a PC emulator or the CFFA itself. I’m still getting the hang of that process. It won’t work for copy protected disks.
So far my only problem with it is that there is a limit to the amount of images you can pack on the flash media. This is somewhere around 250 disk images. But all-in-all, this is a great product and an essential add-on if you want to get serious about turning that old Apple ][ back on.
I recently have been on a bit of an Apple II retro-computing kick. There was so much great software for the Apple 2 and I have many-a-fond memories of games like Karateka, Star Blazer and Ultima. In the early eighties my dad bought a Apple ][+ and this is where I learned the ins and outs of programming. In fact, I have posted a few of my better creations on this very web site (check out Dippy Golf and Malfunction).
I still own an Apple IIgs—the last of the Apple 2 computers before Apple went all Macintoshy—and Apple’s direct competitor to the Commodore Amiga. It’s fun to fire it up every now and again and listen to those 5.25″ drives grind away. What’s great about playing around with a twenty year old computer is that all that software that looked so cool, expensive and unattainable back in the day is now widely available for download on the Internet.
Disk Images and Emulators
The ultimate resource for all things Apple //e and earlier is Asimov FTP Archive. From here you can find just about every piece of software ever created for the Apple II in disk image format (usually a .DSK, .PO or .NIB file). Be warned, even though most of the companies that created this software are long gone, downloading old “Abandoned” software is still a legal gray area and there’s always a chance, albeit quite slim, that you may get in trouble for this.
On a PC you can get these disk images running quite easily in AppleWin by just dragging the .DSK file into the program window. AppleWin is an Apple II emulator, a program that mimics the hardware of another computer in software. There are several Apple emulators out there, but this one is the best.
There is also a great resource for IIgs called What Is the Apple IIgs? In addition to being a pretty complete history of the system, they also host disk images and packaging for most of the software ever released for the IIgs. In this case the file format is the .2MG disk image format. AppleWin can’t emulate the IIgs so you will need to use another program.
Emulators for the IIgs are not nearly as good as AppleWin. There seem to be many choices if you are running OSX. However, if you are running Windows, you are a bit limited. The one that I have gotten familiar with is Kegs32 (a Geocities link… you’ve been warned)ActiveGS. It is far from perfect and can’t run everything. The developers could learn a thing or two about usability from AppleWin. Flaws aside, once you get over the initial learning curve it can do a fairly good job with several IIgs programs, especially system software.
If all this downloading is a bit much for you, the easiest way to explore Apple II software is via a browser applet/plug-in/activex widget at Virtual Apple ][.
Using Disk Images on an Actual Apple II
Running old software in emulation can be good and bad. Most of the times emulation is much faster and convenient. In the case of AppleWin you can save the state of the machine. This means you can save your game even in a program that doesn’t natively support save games. Also, you can throttle the disk speed and machine speed to make productivity software run much better than it ever ran on the actual hardware. As good as the programs look on a modern LCD-type screen, they still look better on a nice tiny tube monitor. It gives the graphics a pleasant contrasty glow.
In the case of the IIgs, no one has quite nailed the emulation as accurate as they could. For this reason, you’ll be pleased to know that you can take those disk images you grabbed off of the Web and transfer them to actual floppy disks! I was really excited when I discovered this, but my hopes were squashed when I actually tried to get files from my PC to my IIgs. It took me a very long time combing through usenet and other on-line resources to figure out just how to do it with my set up. There are a few ways to accomplish this, but many of the methods involve things like null modems and SSH. A bit too nerdy even for me. On this page I will go through my process step-by-step to show you how it’s done.
The Tools You’ll Need
Hardware requirements are one of the biggest hurdles in this process. Here is the list of things you will need to get disk images off your PC and on to your Apple 2:
An Apple IIgs with 3.5″ and 5.25″ floppy drives. If you don’t have a IIgs, I can’t help you. All of the software I use is IIgs specific, so if you only have your //e you’ll have to look elsewhere for help
A PC with 3.5″ floppy drive. Seems simple enough, except that they don’t build 3.5″ drives into PC these days. I bought a Sony USB floppy drive from NewEgg.com for around $20 and it does the job very well.
A Macintosh computer running System 9 or earlier. This is the biggie. Not many people have old Macs just lying around. Fortunately, I inherited one from my office, but you may have to troll eBay or Freecycle to find one. OS X will not cut it. System 7,8,9 supported the ProDos disk format, which is the Apple II format, and I don’t think OS X supports this (besides, most OS X Macs don’t have floppy drives either)
Lots of Blank 3.5″ or 5.25″ disks! These are getting quite hard to find nowadays, but there are still sources out on the net if you search. I have tons of 3.5″ floppies from a 32 disk backup installation of Windows 95 that I never needed to use.
Step 1: Getting Files Off Your PC
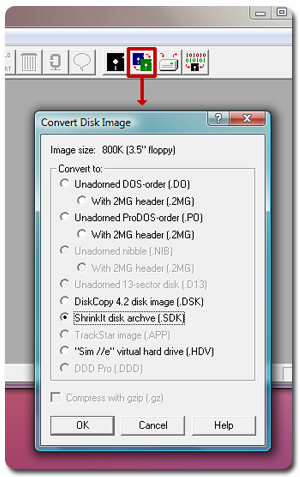
So you found a .2MG file that you want to get on your IIgs. The problem with .2mg files is that the IIgs doesn’t know what to do with them, and, in most cases, a .2MG file is larger than the 800K that can fit on a ProDos floppy. You will need to compress the .2MG file into a ShrinkIt file. ShrinkIt is the .ZIP file equivalent for the IIgs. In addition to being able to archive a group of files you can also use it to create a compressed disk image.
(What Is the Apple IIgs? used to allow you to download files in .SHK ShrinkIt format. Due to bandwidth issues, they now only offer the .2MG files. Oh well)
Never fear. There is an open-source Windows software out there than can decipher and convert all sorts of Apple ][ files and disk images: CiderPress. After installing CiderPress, run it and choose the Disk Image Converter function from the Tools menu. Simply select your .2MG file then choose ShrinkIt Disk Archive (.SDK) from the options and save your converted file. This .SDK file can now be saved to a PC formatted floppy. You will notice that this file is actually compressed and smaller in file size than the original.
Step 2: Transferring the Image to a ProDos Disk.
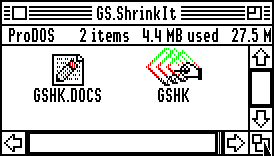
This next step is simple, but is dependent on you having access to an older Macintosh computer running System 7, 8 or 9. If you are lucky enough to have one of these machines, you can simply insert your PC formatted floppy in the drive and drag the .SDK file on to your desktop. Then format a ProDos floppy (either on the Mac or your IIgs) and insert it into your Mac’s floppy drive. Next, drag the .SDK file from your Mac desktop on to this ProDos floppy. Now your disk image is ready to make its way to your IIgs via good old fashioned sneaker net.
Step 3: Creating and Actual Disk from the Disk Image
Now, the rest of the action will take place on your Apple IIgs. Boot up your IIgs System disk. The essential piece of software that you will need is GS ShrinkIt. ShrinkIt is a common compression format on the Apple 2. If you don’t already have GS ShrinkIt for your ][gs, getting it up and running can be a bit of a challenge. I was lucky to have it already from back in the day, but if you need it, I’d suggest reading this page from the Apple II Csa2 FAQ.
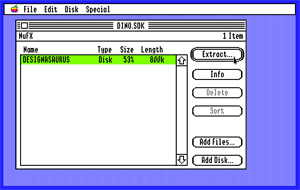
Run GS ShrinkIt and select OPEN ARCHIVE from the FILE menu. Now insert your disk with the .SDK file on it and open the file. You may need to check the “Show All Files” radio button in order to find the file. If all went well, you should be able to open the file and see the contents of the compressed .SDK file.
Have a blank 3.5″ floppy ready and click the Extract button. Insert your floppy and follow the prompts to select the drive in which your blank disk resides. You will then have to wait while the computer grinds away and copies your disk image to the floppy. If all goes well you should now have a working copy of the software which you downloaded off the Internet. Have fun!
UPDATE: I no longer need to follow this method. To find out why, read my post about the CFFA 3000.
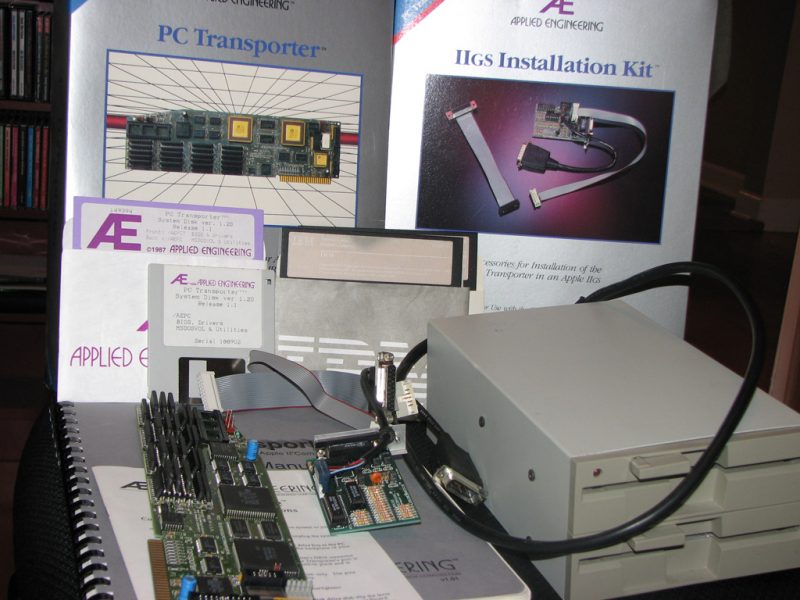
This is the Applied Engineering PC Transporter. It allows you to run MS-DOS applications on your Apple IIgs! It can also be used as a ~800K RAM disk. Click the following image for a closer view:
This auction includes all the items pictured above, including the following:
PC Transporter card, includes original box and manual
II GS Installation kit, includes original box and the cards an cables need to connect the PC Transporter to your Apple II GS
A 2 Bay “Transdrive” Floppy Drive for MS-DOS disks and its leaflet manual (with instructions on setting jumpers, etc.)
Original PC Transporter System disks (both the 3.5″ & 5.25″ versions)
An original IBM MS-DOS 2.0 disk and accompaning system tools disk, both are 5.25″ floppies.
Note: The MS-DOS drive spins quietly the entire time that it recognizes that there is a disk inside. This has no apparent effect on its operation, and I assume this is the correct behavior for the drive. But it’s been more than a decade since I used this with any regularity, so I don’t know for sure.
At the time of this posting, this has been completely tested and is working. Here is a video demonstration of the actual item I am selling that I recorded just before removing the parts from my GS and packing them up for this auction (or watch the annotated version with dorky stock music on YouTube):
Even though the card is leaving here in working form, I can make no guarantees as to if it will work in your machine. Therefore, I am selling this item AS IS. Please buy shipping insurance if you have any concerns. I will ship to the US only. The entire package is going to weigh somewhere between 8-10 lbs. Contact me if you have any questions. Here the link to the eBay Auction… bid early… bid often!
UPDATE: The package eventually sold for around $155! Woo hoo!
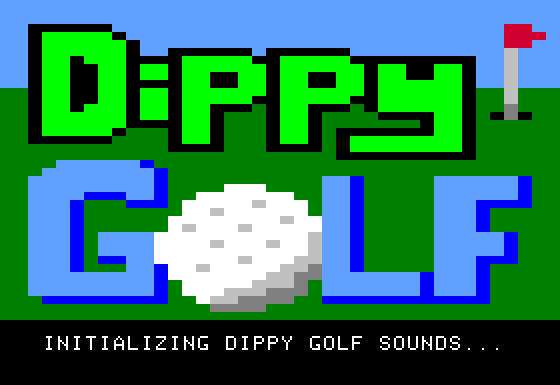
After posting Malfunction, my text adventure game for the Apple ][, I have been spending a whole bunch of time tinkering with my old Apple ][ software creations. Another one of my better creations was a golf game that I titled, Dippy Golf. This game featured nine holes which were loaded in from external graphics files and, even more impressive, was the use of audio samples of my voice! The game worked but still felt somewhat unfinished, so I decided to complete the game and post it here on the Pages of Fun!
One of the first major additions that you will see is the snazzy splash page and loading message:
This was actually the last thing I added to the new version of the game, but I wanted to use my other upgraded piece of software, Lo-Paint 2. More about that later. The game takes several seconds to load the audio samples. Creating samples on the Apple ][ was incredibly difficult. I used a piece of software called The Voice by Muse. This application was developed in part by Silas Warner, the creator of the Castle Wolfenstein series of games.
The process of getting audio into the computer required taping myself on a cassette recorder, than plugging the recorder into the never-really-used tape data jack on the back of the Apple ][. The sound quality is awful, but this was about the best you could do on an Apple ][. You should note, that this is a golf game, so one of the samples is a naughty word. I stole the idea from an early Mac golf game which my neighbor owned.
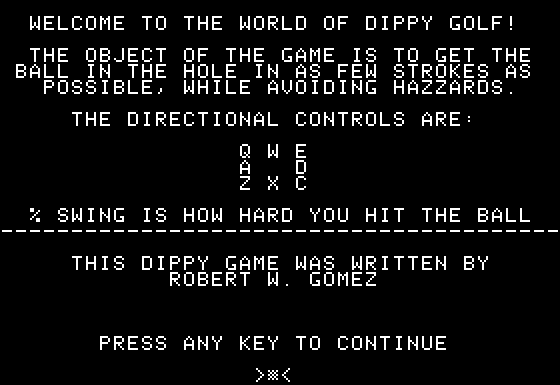
Anyhow, on to the introduction/instructions screen:
I love that old, uppercase Apple ][ font. One of my improvements here was to center the text on the page and use a nicer prompt for a key press. After this page you proceed to the first hole:
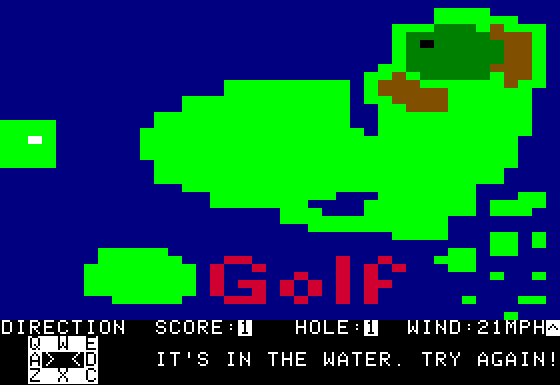
As you can see, the graphics are in Apple 2 lo-res mode graphics. In this mode you are allowed 40×40 pixels, 16 colors and four lines of text. As crude as this image is, I believe it’s actually higher resolution than Atari 2600 golf.
The game mechanics are simple. You point in a direction then specify how hard you want to hit the ball. This was fine as a proof of concept, but didn’t provide much challenge once you memorized the best angles and swing percentages for each hole. The major 2009 update to game play was the addition of the random element of the wind. This makes the ball behavior somewhat unpredictable (like real golf for me) and can push the player into taking riskier shots in hopes of catching that breeze for a few extra pixels of distance. On some holes, like the one pictured next, it really adds to the challenge.
Without the wind, you could reliably hit to the micro-islands off the right of the screen.
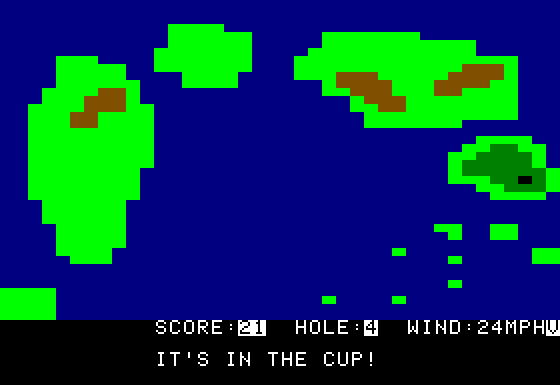
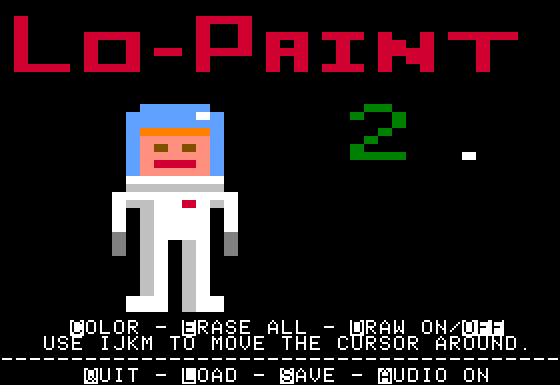
All of these holes where drawn using an art tool which I programmed called Lo-Paint. In addition to my Dippy Golf updates, I also updated Lo-Paint and included it on the disk. This was a major upgrade to the tool so I consider this version 2 of the software. The interface has been completely revamped and now you can save and load lo-res images! Check out this screen shot of Lo-Paint 2 in action!
If you want to try out Lo-Paint 2 or Dippy Golf download the disk image which is attached to this post and open it up in AppleWin or your favorite Apple ][ emulator.
(Okay, Masterpiece should probably be in quotes too!) I have been on a bit of a retro computing kick this evening. I have been playing around with AppleWin, which is the best Apple ][ emulator for Windows that I know of. I played a little bit of the original Castle Wolfenstein and then decided to fire up my trusty Apple ][gs and port some of my old Applesoft programs to PC.
The process of transforming a 5.25″ floppy to a disk image is somewhat complicated, but not too bad if you have the right tools. First, I turned on my ][gs and booted the System 6 disk. I then ran the awesome program Asimov (by Ninjaforce) which can create and “burn” Apple ][ disk images. I was able to save six 5.25″ disk images onto a single 3.5″ ProDos floppy. The next step is taking this 3.5″ floppy down to my System 9 Mac which I keep stowed away in my basement. The old Mac system could read ProDos disks so I am able to pull the files off the floppy and then save them to a PC formatted 3.5″ floppy (or send them over a network, but I am not connected in my basement). I have a USB floppy drive on my PC specifically for this purpose. Once the disk images are on my PC’s hard drive (with a .dsk extension) I can boot them in AppleWin.
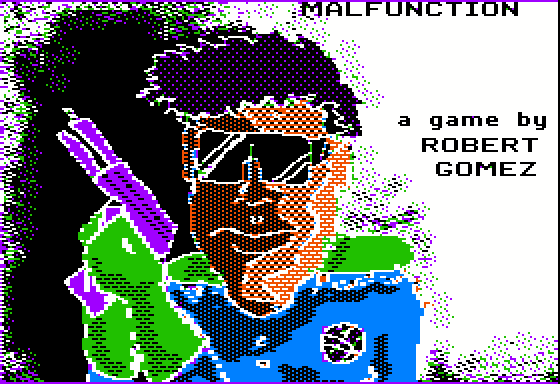
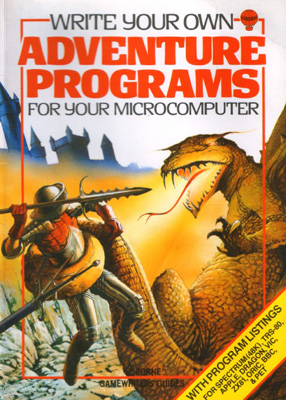
I spent a few hours running my old programs. Most of them are pretty stupid, but I can’t believe I wrote them as a 10 or 11 year-old. I will post some screenshots in the near future. However, sometime in my sophomore or junior year of high school I took the time to create a full text adventure called, “Malfunction.” My code was based on the code in the book Write Your Own Adventure Programs For Your Microcomputer by Usborne Computer Books. The book guided you through the creation of a haunted house game. I was taken step-by-step through the process of game design–from creating maps and puzzles to programming a text parser. This was a great book, and I’d love to see an updated, perhaps Flash actionscript oriented, version.
Now, more than 20 years later, I have decided to publish my game!
In order to play the game you will need to install an Apple 2 emulator. For windows, I use AppleWin. It’s really simple and runs near-perfectly. As for other platforms like Mac, I’m not-so-sure. Look to Google for your answers.
The game is mediocre at best, but I am pretty proud of it. I learned a ton about programming when I created this. I hope you enjoy it. Please feel free to leave me some comments about what you think.
Recently, I took the time to enter an art contest. It was sponsored by AtariAge.com—a Web site devoted to the the preservation of the Atari 2600 and other ancient Atari computers and consoles. They also are one of the few places that sell new(!) games for the Atari 2600.
It was one of these new, so-called homebrew games that was the object of the contest. The game is called Elevators Amiss and it involves running a tiny pixelized chambermaid up the floors of a hotel, trying to avoid the elevators that move up and down across your path. Think of it as a less complicated version of Frogger. The winner of the contest was to receive a copy of the game and a credit from the AtariAge store. That was enough to get me to give it a go (I’ve been eying the Joystick to USB converter for awhile now).
My approach to the design was to create an image that was dynamic and made you think you were buying a 3-D video action extravaganza… pretty much like every Atari game box tricked me into thinking when I was a kid. Looking back on past winners, I noticed that there were many entries that used some of the same design and layout of the classic games that Atari put out in the early eighties. In my opinion, such designs go against the spirit of homebrew Atari games. These games are not really about nostalgia, they more are about taking a near-dead platform and breathing new life into the system.
The hardest part about illustrating this game it that the theme of killer elevators doesn’t work well outside of the constraints of the 2-D pixelated screen. My idea was to have the elevators flying through the walls and ceilings, completely dislodged from their elevator shafts smashing everything in their paths. In the image, the chambermaid is sprinting down the hall, just avoiding a crashing elevator car. Originally, I was going to give her a rainbow colored tracing of her movements trailing behind her (ala the Keystone Kapers box) but I liked my elevator painting too much to cover it up with action lines. Anyhow, here’s the final product for your viewing pleasure.
Unfortunately, I did not win the contest. The winner was Nathan Strumm #1. It was one of the better ideas, but to me it doesn’t capture the essence of the actual game play. My personal favorite was Patricio Cuello #1—simple idea, well executed with lots of colors. It seemed very appropriate to me. Check out the contest page to see all the entries.