A pandemic ago I decided to heed the warnings on the Apple ][ Facebook group and remove the 30-year-old battery from my Apple IIgs computer. This is harder than it should be since Apple thought it was a good idea to permanently attach this ticking time bomb to the motherboard. My solution was to clip out the old battery and solder in a plastic battery holder instead. This is not that hard to do, but I am a complete klutz when it comes to soldering. Destroy the motherboard with a mountain of silvery metal was always a possible outcome. I documented the process and present it here. Originally I had intended to do a hilariously comic narration over the video but I eventually came to my senses. Enjoy the video, video enjoyers:
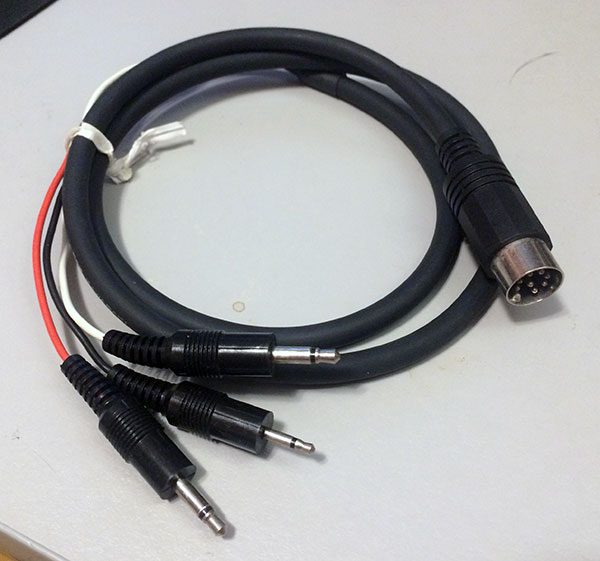
On this site, I had previously posted a set of 24 Yamaha DX100 synth patches for download. The DX is a notoriously difficult synthesizer to program. That difficulty extends to its load/save workflow as well. Originally, the DX100 came with a special cord with a MIDI-style plug on one end and three headphone-sized jacks on the other. This is meant to be plugged into a data cassette recorder. The red cable is audio out, the white is audio in, and the black (I assume) controls the tape player. You hit a button combo on the DX100 and then a screeching modem sound is output to the tape. Modern users can record this sound on a computer as a .WAV file and it will work the same as and old-school tape deck. This works okay, but there is a better way to archive and reload sounds.
Meet Sysex
Sysex stands for system exclusive and it’s a part of the MIDI standard that allows synth manufacturers to define their own specific message formats. In our case it is useful because the DX100 uses sysex to store and retrieve patches. With some free software and a cheap hardware interface, you can easily store and retrieve synth sounds on your PC as both individual patches and a complete 24 patch bank.
Requirements
A Yamaha DX100 Synthesizer
A DX27 should also use the same data, but I have not tested that.
A MIDI Interface
I opted to go the cheapest possible route and bought a Roland UM-One from Sweetwater. This cable is a USB connector on one end and MIDI In/Out on the other.
Connect your DX to the PC and all the sudden you can control VSTs with the DX or send sequences from your favorite DAW to the synth. I have Windows 10, and this worked perfectly with no special set up or drivers needed.
Bome SendSX
This is a tiny, powerful software utility that does two things. It reads and sends sysex data. You can actually see the data flowing in as you play the keyboard. Your playing is translated into beautiful hex values instantaneously. Download Bome SendSx for free!
Saving All Your Patches at Once to PC
On the Yamaha DX100 user patches are saved in the Internal bank of 24 patches. These are typically accessed by pressing the internal button and then any of the 24 green numbered buttons. To save all 24 of these patches at once do the following:
Step 1: Connect The Hardware
Connect your DX100 to the PC using the MIDI interface
Step 2: Enable Sysex
On your DX100 press the brown Function/Compare button.You’ll know you are in function mode because there will be an uppercase F in the left side of the screen. When function mode is enabled, the number buttons correlate the function listed in below each button.
Press the Sys Info key (green key #5).
The screen should say Sys.Info:on. If it is set to off, press the +1 Yes key to turn it on.
I think it’s pretty safe to just always leave this on.
Step 3: Get Ready to Transmit MIDI
Press the Sys Info key again until the screen displays Midi Transmit?
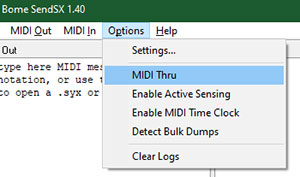
Step 4: Set up SendSX to Receive Data
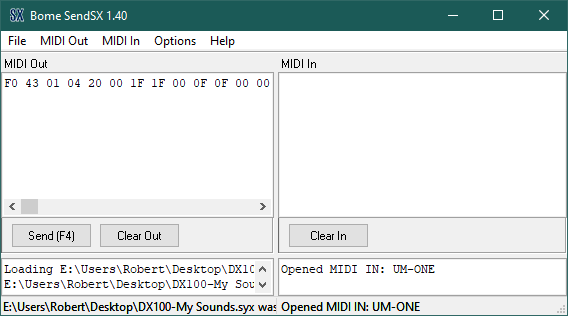
Back on your PC, open SendSX and, under Options, make sure that MIDI Thru is unchecked.
Click the Clear In button to erase any data in the IN window.
The Midi In pane should be empty and SendSX is ready to receive data.
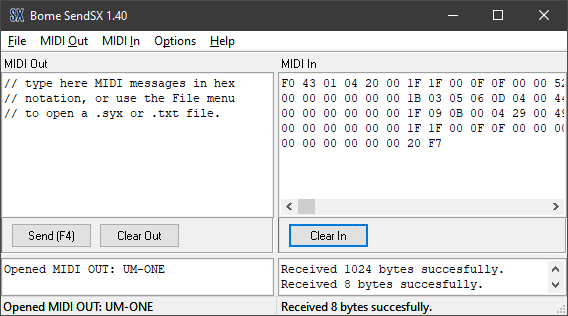
Step 5: Transmit Your Patches
While the screen reads Midi Transmit? on your DX100, press the +1 Yes button to transmit your data to the PC.
And don’t touch anything else on your DX! You will now see a bunch of hex values in the Midi In pane in SendSX and a success message.
Step 6: Save the Data on Your PC
From the SendSX File menu chose Save Midi In to save your patches on your computer as a .SYX file (or TXT if you want).
Saving a Single Patch to PC
Saving a single patch is a little easier. The simple act of switching patches instantly transmits that patch’s sysex info over MIDI. Just make sure to follow steps 1–2 above to turn on Sys.Info:on. Detailed steps are as follows:
Step 1: Locate Your Patch
On your DX100 find the patch you want to save. It can be any of the 192 factory patches or any of 24 user-programmed internal slots. Let’s say I want to save internal patch 14. I press internal then button 14.
Step 2: Set up SendSX to Receive Data
Same as Step 4 above. Open SendSX your your PC and click the Clear In button and insure MIDI Thru is disabled
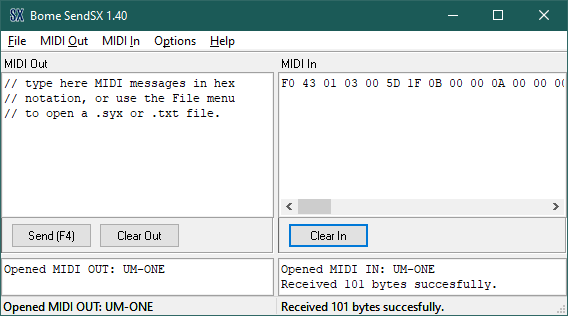
Step 3: Transmit Your Patch’s Data
Press just the number key of your chosen patch again. In my example, I’d press button 14 again. As before, don’t touch anything else on your DX after hitting the number button!
You should now see a bunch of hex values in the Midi In pane in SendSX and a success message. The hex string should be shorter than before (around 101 bytes).
Step 4: Save Your .SYX File
From the SendSX FILE menu chose Save Midi In to save your patch on your computer as a .SYX file as you did with the complete bank save.
Transferring a Set of Patches from your PC to the DX100
Transferring patches from your PC to your DX100 is also handled by SendSX.
Step 1: Prepare SendSX for the Transfer
Open SendSX and click the Clear Out button to erase the contents of the Midi Out pane.
Go to File then Open to find and open your saved .SYX file.
Opening the file will populate the Midi Out pane with hex values.
Step 2: Turn Off Memory Protection on the DX100
On your DX we need to turn offMemory Protection mode by pressing the brown Function button and then the Memory Protect button (number 12) .
The screen will probably read M.Protect:on. Switch this to off by pressing the -1 No Key.
It should now read M.Protect:off. From this point on be careful because, with memory protection off, it is possible to delete or alter saved patches.
Step 3: Transmit Your Patches
In SendSX click the Send(F4) button. It doesn’t matter what you are doing on the synthesizer. If memory protection is off, the Internal patch bank will be replaced with the saved sysex data.
Step 4: Turn Memory Protection Back On
Turn Memory Protection back on to prevent an accidental erasing of patches. Press Function then Memory Protect then +1 Yes to reenable it.
And Finally… Loading a Single Patch to the DX100
Follow the steps 1–2 above to load your single patch into SendSX and turn off Memory Protection on the DX.
Step 3: Select Your Patch Location
Get your DX100 ready to receive data by selecting the internal patch location that you want to overwrite. Press Internal button then any of the 24 number buttons.
Step 4: Transmit the Data From SendSX
In SendSX click the Send(F4) button. The DX will now have the patch loaded and selected in the slot location from the previous step. If you play the keyboard you will hear your loaded patch, but…
Step 5: Save Your New Patch on the DX100
Your patch will not be saved just yet. If you switch to another patch, the sysex loaded patch will vanish from memory! You need to save the patch in the same manner you would save any edited sound.
Press Function button then the reddish Store button and select the internal slot in which you want the patch saved. This will probably be the same number that you selected in step #4.
For example the screen will say Mem Store 2→?. Press the Number 2 button and the patch will be saved in internal slot #2.
Note: You don’t necessarily need to be in Function mode to save a sound. You just want to be sure you are not in Edit mode because then the Store button becomes the EG Copy button.
Step 6: Turn Memory Protection Back On
Turn Memory Protection back on to prevent an accidental erasing of patches. Press Function then Memory Protect then +1 Yes to reenable it.
In Conclusion…
Well, that was a lot of info. Trust me it’s not that difficult. I just like to break tutorials up into very detailed steps to make sure you understand everything you are doing. Now if you want to download some of my custom DX100 patches download the .ZIP below which contains all the sounds from this post as both a complete 24 patch bank and 24 individual patches.
Update (June 2020): All of the sudden, iTunes started supporting books on the iPad 1 again so this article is mostly moot. I leave it here for posterity.
Apple has a history of abandoning users whenever they introduce a new product to the market. This wasn’t always the case. The Apple IIgs, despite its 16-bit architecture, allowed for most of the old 8-bit Apple ][ software to run on the new system. However, since the introduction of OSX, the attitude has been, “Deal with it old-timers. We know what’s best for you.”
I am the proud owner of a first generation iPad 1. I use it to play music and read eBooks. It performs these two tasks as well as any modern iPad or iPhone does. Alas, in their attempt streamline the software, Apple removed to ability to transfer PDFs and eBooks to an iPad 1 from iTunes. The entire Books section has been removed from the product with the expectation that iPad users will now get their content from the cloud. The problem is that iCloud, Dropbox and other cloud storage systems no longer work on an iPad 1.
My attempts to Google a solution have had mixed results. Apple is no help. The user help forums are filled with bad advice. In my frustration I have figured out a relatively simple way to get files, especially books, to your iPad 1. In a nutshell, we are going to create a web page containing links to all your books and then, assuming your computer and ipad are on the same local wi-fi network, browse to that web site on our iPad to download the files to iBooks.
The only catch here is that the process requires you to download a piece of software to your Mac or PC. The application is called Prepros. It is free to download and use from Prepros.io. It is an excellent piece of software that is normally a tool used for Web development to pre-process code and make it ready for a Web page. But we are going to use it as our file server.
Step 1: Download, Install and Run Prepros
If installing an application is too complicated for you, maybe you should stick to paper books.
Step 2: Organize Files for Transfer
Put any files that you want to transfer to your iPad in a single folder. In my example I have put a bunch of PDFs into a folder on my desktop called “GOG.com Manuals.” Here’s my folder next to the open Prepros app window:
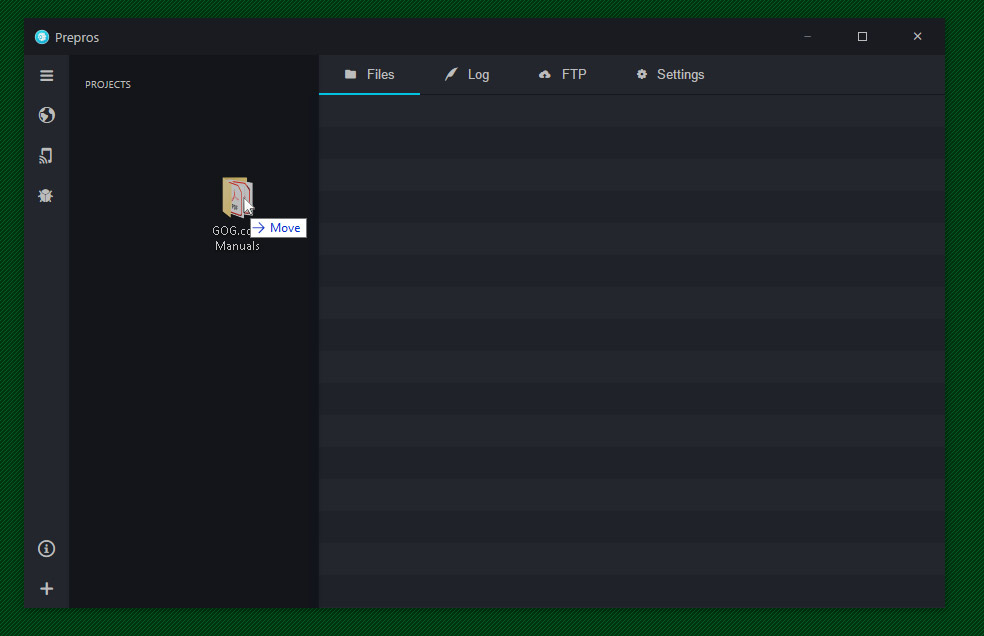
Step 3: Drag and Drop your Folder into Prepros
Drag your folder into the Prepros window and drop it into the “Projects” panel.
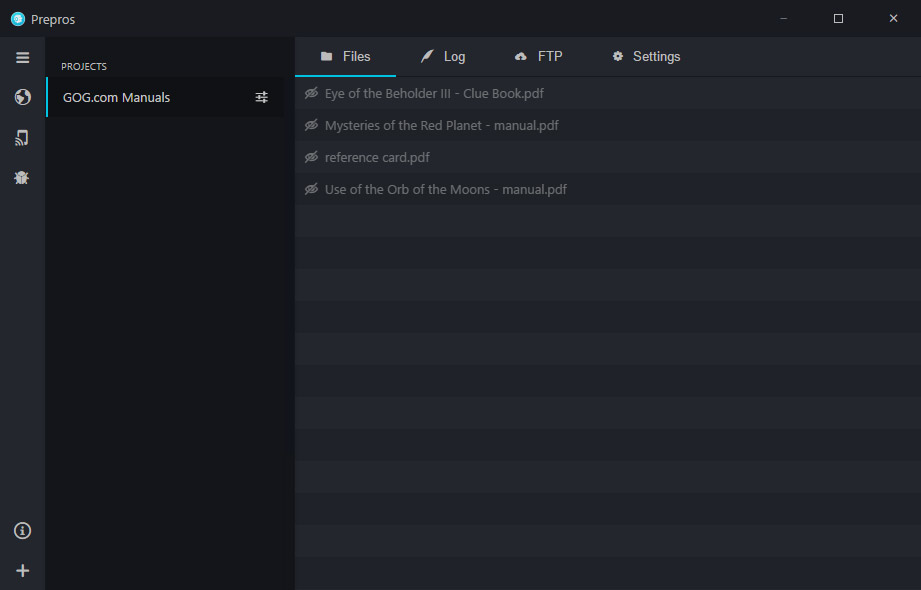
Your folder will now appear as a “Project” with any files from the folder listed in the right panel under “Files.”
Step 4: Start the File Server
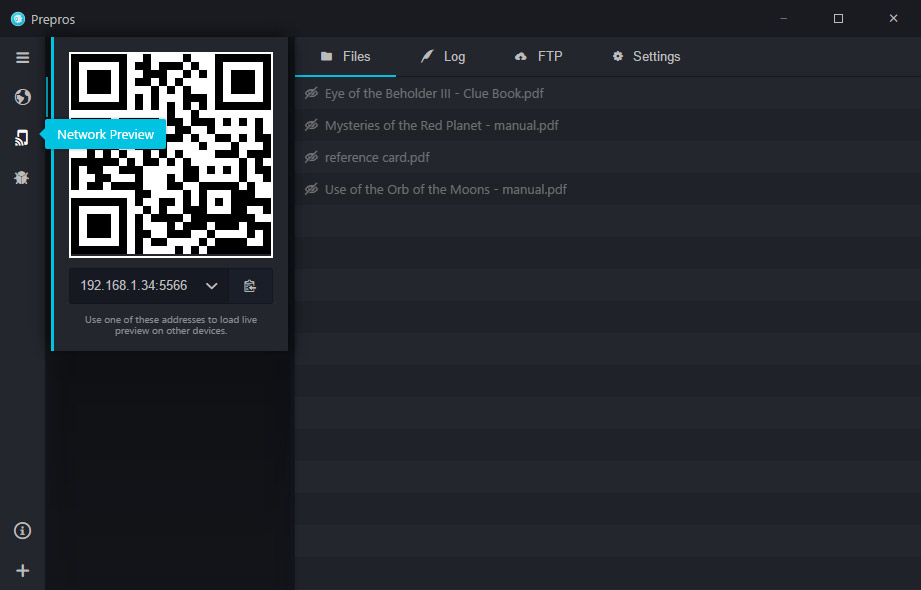
We are now going to start a local network file server by clicking the Network Preview icon (looks like a Wi-fi/Phone) on the left side of the window:
If an iPad 1 had a camera we could scan the big QR code, but for us old-timers, an IP address is provided in the popup. Note the number in the box. In the above example the IP address is 192.168.1.34:5566
Step 5: Type the IP Address into Safari on your iPad 1
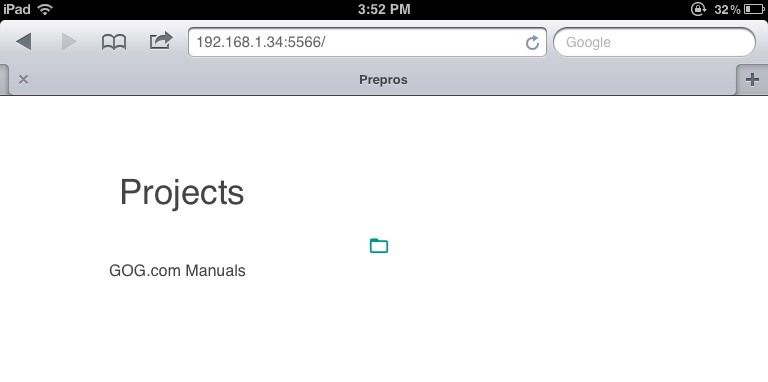
Turn on your (wi-fi connected) iPad, open Safari and enter the IP address into the location bar. Your Prepros file server will appear as a Web page:
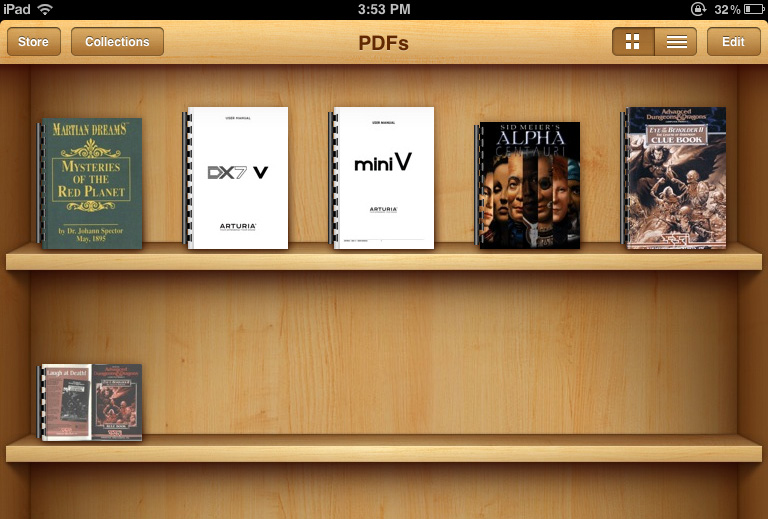
Tap on the appropriate folder to see your list files. In this example, there is only my “GOG.com Manuals” directory.
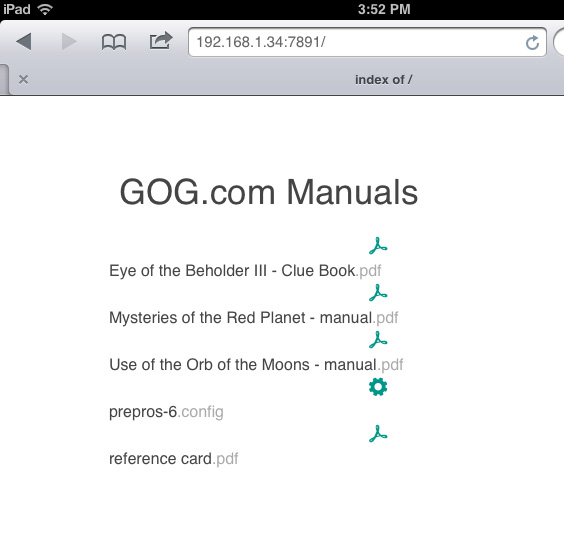
Step 6: Tap on the File you Want to Transfer to iBooks
Your files from your PC or Mac should now be visible (there will also be a file called prepros-6.config, ignore that). Tap on the PDF you want to open the PDF in Safari:
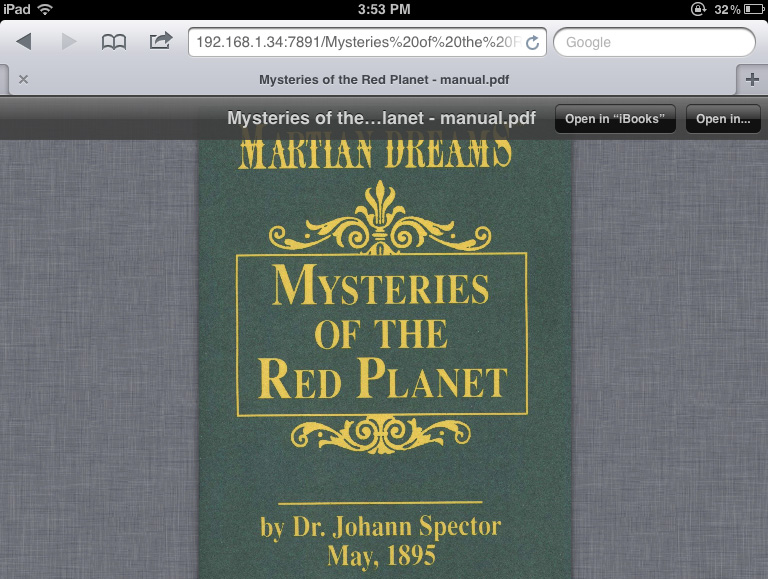
Step 7: Tap the Open in iBooks Button
The PDF will render in the Safari window. A couple of buttons will also appear at the top of the PDF which will allow you to transfer the PDF into your iBooks library. If the buttons aren’t visible tap the PDF page to make them reappear. Tap the Open in iBooks button:
Step 8: Enjoy your eBook on your iPad!
The iPad should automagically switch to iBooks and your PDF/ebook will appear on your shelves. You can keep transferring books, or, if you are done, close out of Safari and exit Prepros on your computer. The book is now permanently on your iPad.
I know this seems like a lot of steps, but I want to be thorough. In this age of command line interfaces, detailed tutorials are hard to come by.
P.S. If you like Prepros, please buy it. It is one of the only shareware programs I have ever bought and I use it every single day as a Web developer.
I recently have been on a bit of an Apple II retro-computing kick. There was so much great software for the Apple 2 and I have many-a-fond memories of games like Karateka, Star Blazer and Ultima. In the early eighties my dad bought a Apple ][+ and this is where I learned the ins and outs of programming. In fact, I have posted a few of my better creations on this very web site (check out Dippy Golf and Malfunction).
I still own an Apple IIgs—the last of the Apple 2 computers before Apple went all Macintoshy—and Apple’s direct competitor to the Commodore Amiga. It’s fun to fire it up every now and again and listen to those 5.25″ drives grind away. What’s great about playing around with a twenty year old computer is that all that software that looked so cool, expensive and unattainable back in the day is now widely available for download on the Internet.
Disk Images and Emulators
The ultimate resource for all things Apple //e and earlier is Asimov FTP Archive. From here you can find just about every piece of software ever created for the Apple II in disk image format (usually a .DSK, .PO or .NIB file). Be warned, even though most of the companies that created this software are long gone, downloading old “Abandoned” software is still a legal gray area and there’s always a chance, albeit quite slim, that you may get in trouble for this.
On a PC you can get these disk images running quite easily in AppleWin by just dragging the .DSK file into the program window. AppleWin is an Apple II emulator, a program that mimics the hardware of another computer in software. There are several Apple emulators out there, but this one is the best.
There is also a great resource for IIgs called What Is the Apple IIgs? In addition to being a pretty complete history of the system, they also host disk images and packaging for most of the software ever released for the IIgs. In this case the file format is the .2MG disk image format. AppleWin can’t emulate the IIgs so you will need to use another program.
Emulators for the IIgs are not nearly as good as AppleWin. There seem to be many choices if you are running OSX. However, if you are running Windows, you are a bit limited. The one that I have gotten familiar with is Kegs32 (a Geocities link… you’ve been warned)ActiveGS. It is far from perfect and can’t run everything. The developers could learn a thing or two about usability from AppleWin. Flaws aside, once you get over the initial learning curve it can do a fairly good job with several IIgs programs, especially system software.
If all this downloading is a bit much for you, the easiest way to explore Apple II software is via a browser applet/plug-in/activex widget at Virtual Apple ][.
Using Disk Images on an Actual Apple II
Running old software in emulation can be good and bad. Most of the times emulation is much faster and convenient. In the case of AppleWin you can save the state of the machine. This means you can save your game even in a program that doesn’t natively support save games. Also, you can throttle the disk speed and machine speed to make productivity software run much better than it ever ran on the actual hardware. As good as the programs look on a modern LCD-type screen, they still look better on a nice tiny tube monitor. It gives the graphics a pleasant contrasty glow.
In the case of the IIgs, no one has quite nailed the emulation as accurate as they could. For this reason, you’ll be pleased to know that you can take those disk images you grabbed off of the Web and transfer them to actual floppy disks! I was really excited when I discovered this, but my hopes were squashed when I actually tried to get files from my PC to my IIgs. It took me a very long time combing through usenet and other on-line resources to figure out just how to do it with my set up. There are a few ways to accomplish this, but many of the methods involve things like null modems and SSH. A bit too nerdy even for me. On this page I will go through my process step-by-step to show you how it’s done.
The Tools You’ll Need
Hardware requirements are one of the biggest hurdles in this process. Here is the list of things you will need to get disk images off your PC and on to your Apple 2:
An Apple IIgs with 3.5″ and 5.25″ floppy drives. If you don’t have a IIgs, I can’t help you. All of the software I use is IIgs specific, so if you only have your //e you’ll have to look elsewhere for help
A PC with 3.5″ floppy drive. Seems simple enough, except that they don’t build 3.5″ drives into PC these days. I bought a Sony USB floppy drive from NewEgg.com for around $20 and it does the job very well.
A Macintosh computer running System 9 or earlier. This is the biggie. Not many people have old Macs just lying around. Fortunately, I inherited one from my office, but you may have to troll eBay or Freecycle to find one. OS X will not cut it. System 7,8,9 supported the ProDos disk format, which is the Apple II format, and I don’t think OS X supports this (besides, most OS X Macs don’t have floppy drives either)
Lots of Blank 3.5″ or 5.25″ disks! These are getting quite hard to find nowadays, but there are still sources out on the net if you search. I have tons of 3.5″ floppies from a 32 disk backup installation of Windows 95 that I never needed to use.
Step 1: Getting Files Off Your PC
So you found a .2MG file that you want to get on your IIgs. The problem with .2mg files is that the IIgs doesn’t know what to do with them, and, in most cases, a .2MG file is larger than the 800K that can fit on a ProDos floppy. You will need to compress the .2MG file into a ShrinkIt file. ShrinkIt is the .ZIP file equivalent for the IIgs. In addition to being able to archive a group of files you can also use it to create a compressed disk image.
(What Is the Apple IIgs? used to allow you to download files in .SHK ShrinkIt format. Due to bandwidth issues, they now only offer the .2MG files. Oh well)
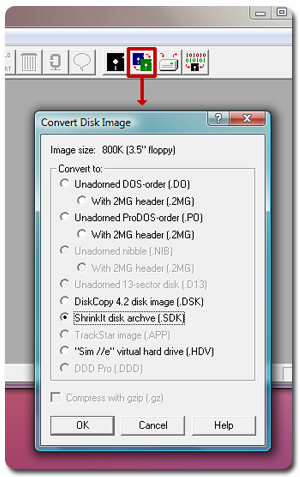
Never fear. There is an open-source Windows software out there than can decipher and convert all sorts of Apple ][ files and disk images: CiderPress. After installing CiderPress, run it and choose the Disk Image Converter function from the Tools menu. Simply select your .2MG file then choose ShrinkIt Disk Archive (.SDK) from the options and save your converted file. This .SDK file can now be saved to a PC formatted floppy. You will notice that this file is actually compressed and smaller in file size than the original.
Step 2: Transferring the Image to a ProDos Disk.
This next step is simple, but is dependent on you having access to an older Macintosh computer running System 7, 8 or 9. If you are lucky enough to have one of these machines, you can simply insert your PC formatted floppy in the drive and drag the .SDK file on to your desktop. Then format a ProDos floppy (either on the Mac or your IIgs) and insert it into your Mac’s floppy drive. Next, drag the .SDK file from your Mac desktop on to this ProDos floppy. Now your disk image is ready to make its way to your IIgs via good old fashioned sneaker net.
Step 3: Creating and Actual Disk from the Disk Image
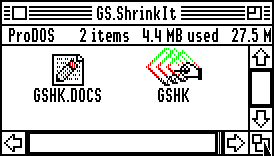
Now, the rest of the action will take place on your Apple IIgs. Boot up your IIgs System disk. The essential piece of software that you will need is GS ShrinkIt. ShrinkIt is a common compression format on the Apple 2. If you don’t already have GS ShrinkIt for your ][gs, getting it up and running can be a bit of a challenge. I was lucky to have it already from back in the day, but if you need it, I’d suggest reading this page from the Apple II Csa2 FAQ.
Run GS ShrinkIt and select OPEN ARCHIVE from the FILE menu. Now insert your disk with the .SDK file on it and open the file. You may need to check the “Show All Files” radio button in order to find the file. If all went well, you should be able to open the file and see the contents of the compressed .SDK file.
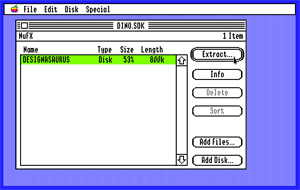
Have a blank 3.5″ floppy ready and click the Extract button. Insert your floppy and follow the prompts to select the drive in which your blank disk resides. You will then have to wait while the computer grinds away and copies your disk image to the floppy. If all goes well you should now have a working copy of the software which you downloaded off the Internet. Have fun!
UPDATE: I no longer need to follow this method. To find out why, read my post about the CFFA 3000.
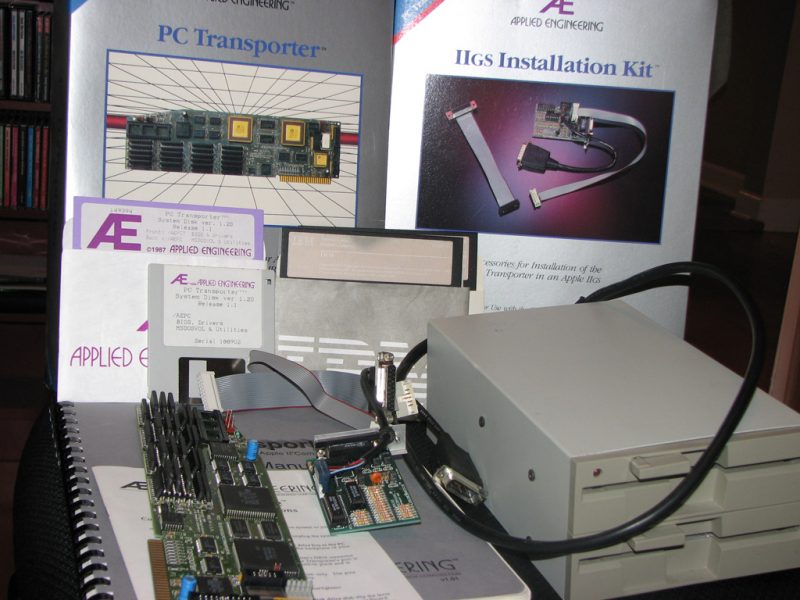
This is the Applied Engineering PC Transporter. It allows you to run MS-DOS applications on your Apple IIgs! It can also be used as a ~800K RAM disk. Click the following image for a closer view:
This auction includes all the items pictured above, including the following:
PC Transporter card, includes original box and manual
II GS Installation kit, includes original box and the cards an cables need to connect the PC Transporter to your Apple II GS
A 2 Bay “Transdrive” Floppy Drive for MS-DOS disks and its leaflet manual (with instructions on setting jumpers, etc.)
Original PC Transporter System disks (both the 3.5″ & 5.25″ versions)
An original IBM MS-DOS 2.0 disk and accompaning system tools disk, both are 5.25″ floppies.
Note: The MS-DOS drive spins quietly the entire time that it recognizes that there is a disk inside. This has no apparent effect on its operation, and I assume this is the correct behavior for the drive. But it’s been more than a decade since I used this with any regularity, so I don’t know for sure.
At the time of this posting, this has been completely tested and is working. Here is a video demonstration of the actual item I am selling that I recorded just before removing the parts from my GS and packing them up for this auction (or watch the annotated version with dorky stock music on YouTube):
Even though the card is leaving here in working form, I can make no guarantees as to if it will work in your machine. Therefore, I am selling this item AS IS. Please buy shipping insurance if you have any concerns. I will ship to the US only. The entire package is going to weigh somewhere between 8-10 lbs. Contact me if you have any questions. Here the link to the eBay Auction… bid early… bid often!
UPDATE: The package eventually sold for around $155! Woo hoo!