It took about two weeks, but I think I have finally finished converting this site to WordPress. The bulk of that process was copying and pasting every post into the new system. I’m sure I probably goofed up a few posts along the way and there are bound to be many broken links. But I think was very thorough, going as far as copying every single comment and tag description.
My reason for moving away from Drupal was my general disappointment with Drupal 8. Nothing ever seemed to work exactly right. I’d make a few changes on the back-end and the site would unbeknownst to me be put in maintenance mode. Several key plugins withered on the vine and stopped working. The built in WYSIWYG editor was absolute garbage. And the worst part of it all was the horrifically user unfriendly update process. There are modules that require Composer to install and update and others that are always in pre-release dev states. No thanks. After a decade of loyal advocacy and usage, it was time to bid Drupal farewell.
I have built a couple WordPress sites for work this year and now feel much more capable in this system. The main disadvantage of WordPress is its lack of a Views plugin. If you want to get creative with outputting data, you need to dive in to .PHP files and WP_Query() loops. There’s a massive user base, so finding help on the Internet is fairly easy and, once you understand the basics, you get an idea of how to accomplish tasks.
As I type this, I am prepping to launch the site. Hopefully all will go well. Having never run a WordPress site with comments enabled I worry that I will find myself buried in comment spam.
This was all a big mistake. Upgrading to Drupal 8, that is. Nothing ever works right and Drupal hates casual users. I am now in the process of converting this site to WordPress by migrating every post by hand. There’s about 1700 posts so it’s going to be a while. There’s probably a plugin that can automagically do this, but the biggest con of WordPress is that good plugins aren’t free. Sigh.
This quarantine has been hard on all of us, but let us not forget the dedicated work that still continues for our nation’s homeopaths. They’re out there in the middle of the fray insuring that the correct dosages in parts per million are being applied to their tinctures. All this despite the disruptions in the world-wide rhinoceros horn supply chain.
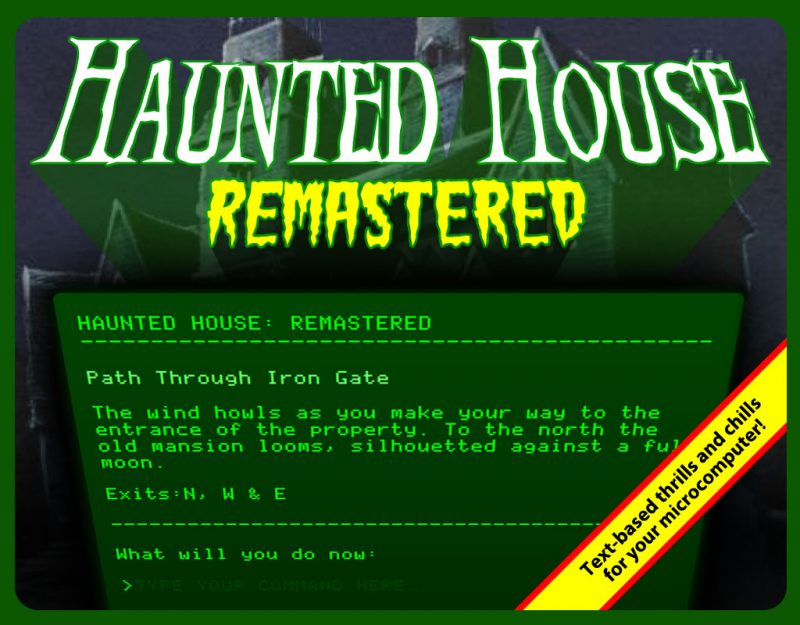
Followers of this site (ed. yeah like that’s a thing) will remember a few years ago I created a in-browser playable version of the Applesoft BASIC game Haunted House for this site. Over the past month or so I got it in my head to push my skills as a programmer and make a much more fully realized version of the game. Today I am releasing my new version of the game, Haunted House: Remastered! It’s a vast improvement on the original in almost every way possible. In other words, it’s actually fun to play.
While it’s nowhere near the level of sophistication of an Infocom game, I think it does some pretty impressive stuff (for my skill level as a programmer). It’s still a two word parser, but the vocabulary is increased. There are full-page help screens, triggered story events, a retro-styled monochrome monitor look, and a bunch of scary sound effects! Please take a few minutes and give the game a try. It’s not too long and I try to keep the puzzle reasonably fair.
Tonight I just started to watch The Legendary Weapons of China again by mistake. This is why I keep blogging these movies. I will eventually forget I’ve seen them before. In any event, I forgot how awesome the first ten minutes of this film is (the rest is not that great). Leave it to the Shaw Brothers to create movies that are written for eight year-olds but filled with all sorts of graphic violence. The best moment is when a fighter is commanded to rip his crotch out. At first he has a very dainty technique:
But it ends with a quick grab and, a backwards flop, and then a fistful of gore flying through the air:
Just finished watching The Witcher on Netflix. I’m probably biased from playing the games, but I thought it was quite good. The lead’s voice takes some time to get used to. Seems like he is just doing an impression of the game’s growly voice actor (complete with the hmms and nose breathing). The series takes about four episodes to start clicking. It’s then that you realize that the story is not being told in chronological order and you start to see how the characters relate. My main quibble is that it jumps into the magic stuff a bit too quickly before laying out ground rules. Going full “epic” so fast is overwhelming. It’s when the show focuses on its characters that it becomes fun. Like an old episode of Hercules or Xena. That is all.
I have resisted migrating this site to Drupal 8 for years. Every time I looked into it there was some killer feature that D8 couldn’t do. The times I attempted testing out the process it was always a complete disaster. Well, time is running out on Drupal 7. The old system is slated for end-of-life in 2020 and it’s now or never for the “upgrade.”
In this post I am going to recap my experience in migrating a fairly simple Drupal 7 site to Drupal 8. Hopefully, someone facing the same issues as me will come across this post and will find something helpful.
Long story short, the migration process sucks bad. If you don’t have a little experience with directly manipulating a database or troubleshooting software in general, don’t even attempt it.
I am not a command-line guy. This was going to be a drush-free migration.The whole push in Web development towards command-line apps for everything has been one of the worst things to happen to the Internet. It is virtually impossible for a beginner to just jump in and start creating content. Developers have made huge strides in interface usability and yet the tools to create those interfaces are nightmares of horrible UI design puzzle-boxes that exist mostly as job security for entrenched Web devs. Thank Shatner for the few out there like Prepros.io who are at least trying to make new technologies user friendly.
The first hurdle for me was finding a decent local development environment that could handle Drupal 8. My old standby, Xampp, has become garbage in recent versions with no 64-bit support and no interface improvements. I found Wampserver64 and it has turned out to be fantastic. Most importantly, it allows me to run two different local domains, which is required as the migration process works by sucking an old site into a new one rather than overwriting an exiting Drupal 7 install.
After setting up a clean Drupal 8 install with all the migration modules installed I set about creating a plan of attack. Oh, as an aside, whatever you do, do not install the Migration Example modules. It will fill your new site with a bunch of garbage content and fields that don’t get removed when you uninstall the module. My first order of business was to determine which I my D7 modules had D8 versions. A spreadsheet and lots of notes proved helpful. I tried to limit only the most integral modules and skip any ones that are just cosmetic. A lot of popular modules have been added into the core, but in many case they are watered down versions (Menu Block stands out as particularly bad).
Migration Begins
At that point I clicked all the buttons, watched and waited. It looked like most of the content came over but there are big problems with text-filters. If they don’t match with the new D8 filters, the content won’t render. That is really dumb. I had to log in too phpMyAdmin to manually change values. The next big problem was that my post were peppered with strange characters. This had to do with my Sql server not having correct character encoding. This article explains the fix you should do before migrating (I had to search and replace for hours because I failed to do this). Basically, add the following to mysql.ini:
The next big problem were comments. Only the most recent comments were rendering and I couldn’t see any difference between those and the bad ones. There appeared to be two tables for comments in the database: comment_field_data and comment__comment_body. Turns out if the langcode column doesn’t match between these two tables, the comments don’t render. More stupidity. Had to manually add “en” to the fields. Thankfully this site doesn’t have that many comments.
Page Caching and Dev Environment
The next step was setting up the local.settings.php to disable caching and render theming helper code. A couple YouTube videos explained this pretty well, although I still am having to flush the cache to see changes half the time.
Views, Oh God Views
Views is a fantastic module. It’s the reason we all use Drupal in the first place. So, why the holy hell aren’t views migrated by default?! So freaking annoying! I had to recreate about 15 custom views manually in order to get many of the site features back. Don’t delete that Drupal 7 site yet. You will definitely need it for reference.
Turning on the Modules
I then started installing and enabling various modules. Like I said earlier, things are different here in Drupal 8. Menu_Block is missing features, Menu_Position is just plain broken (a fix is in the works), Redirect is flaky and throws errors.
Everything to do with CKEditor is horrible. TinyMCE was orders of magnitude better. More robust, more advanced features, better looking, better integration with Drupal… sigh. I have a feeling I am going to be using code view a lot with CKEditor.
Pages of Fun Theme Redux
If there is one area where Drupal 8 is leaps and bounds better than D7 it’s the new Twig-based theming system. The syntax is far less cryptic. A simple {{ content.field_myfield }} renders a field. Perfect. My theme is far simpler than before, yet looks pretty good. Lots of fancy CSS layout tricks here that probably fail in Internet Explorer.
Launching the Site
So, after about two weeks of poking at it, I finally launched the site on December 19th. Within about 30 minutes I got my first spam comment. I do miss Mollum. I’ve tracked down a few anti-spam modules, but it’s going to be tough. I gave up on comments on the Nonagon.us site long ago and this may be a losing battle. Out of my cold dead hands Russian bot farms!
And here we are, a couple days in and things seem to me working okay. I’m sure I will need to upload fixes very soon. There are always sections of the site I miss. And when my first round of analytic come in I may need to start hunting down broken links. In the meantime, click around and enjoy. (And buy my art!)
Well, I have finally made the jump to the newest version of Drupal. We are now running Drupal 8 and, man, was it a pain in the butt to migrate the old site. I will forever recommend WordPress over Drupal to anyone who doesn’t want to pull their hair out every time a new patch is released.
Still, there is a lot to like about the new system. I will soon post the gory details of my migration experience, but, in the meantime, let’s hope this works and that I am not swamped with comment spam.
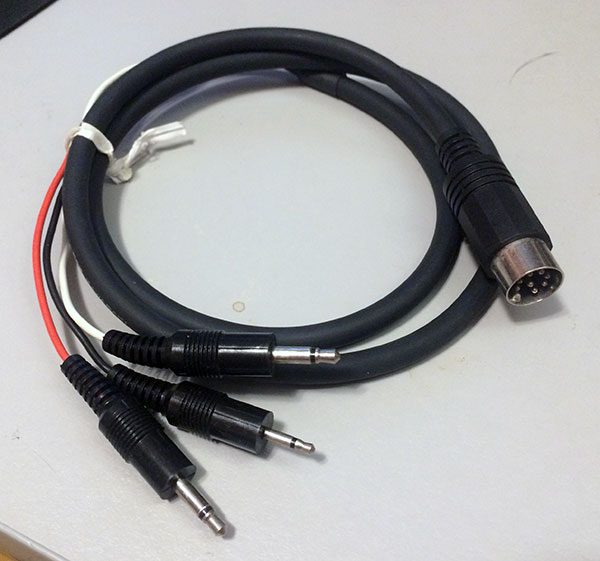
On this site, I had previously posted a set of 24 Yamaha DX100 synth patches for download. The DX is a notoriously difficult synthesizer to program. That difficulty extends to its load/save workflow as well. Originally, the DX100 came with a special cord with a MIDI-style plug on one end and three headphone-sized jacks on the other. This is meant to be plugged into a data cassette recorder. The red cable is audio out, the white is audio in, and the black (I assume) controls the tape player. You hit a button combo on the DX100 and then a screeching modem sound is output to the tape. Modern users can record this sound on a computer as a .WAV file and it will work the same as and old-school tape deck. This works okay, but there is a better way to archive and reload sounds.
Meet Sysex
Sysex stands for system exclusive and it’s a part of the MIDI standard that allows synth manufacturers to define their own specific message formats. In our case it is useful because the DX100 uses sysex to store and retrieve patches. With some free software and a cheap hardware interface, you can easily store and retrieve synth sounds on your PC as both individual patches and a complete 24 patch bank.
Requirements
A Yamaha DX100 Synthesizer
A DX27 should also use the same data, but I have not tested that.
A MIDI Interface
I opted to go the cheapest possible route and bought a Roland UM-One from Sweetwater. This cable is a USB connector on one end and MIDI In/Out on the other.
Connect your DX to the PC and all the sudden you can control VSTs with the DX or send sequences from your favorite DAW to the synth. I have Windows 10, and this worked perfectly with no special set up or drivers needed.
Bome SendSX
This is a tiny, powerful software utility that does two things. It reads and sends sysex data. You can actually see the data flowing in as you play the keyboard. Your playing is translated into beautiful hex values instantaneously. Download Bome SendSx for free!
Saving All Your Patches at Once to PC
On the Yamaha DX100 user patches are saved in the Internal bank of 24 patches. These are typically accessed by pressing the internal button and then any of the 24 green numbered buttons. To save all 24 of these patches at once do the following:
Step 1: Connect The Hardware
Connect your DX100 to the PC using the MIDI interface
Step 2: Enable Sysex
On your DX100 press the brown Function/Compare button.You’ll know you are in function mode because there will be an uppercase F in the left side of the screen. When function mode is enabled, the number buttons correlate the function listed in below each button.
Press the Sys Info key (green key #5).
The screen should say Sys.Info:on. If it is set to off, press the +1 Yes key to turn it on.
I think it’s pretty safe to just always leave this on.
Step 3: Get Ready to Transmit MIDI
Press the Sys Info key again until the screen displays Midi Transmit?
Step 4: Set up SendSX to Receive Data
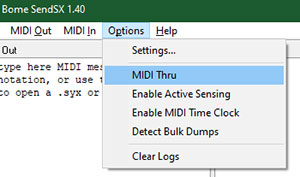
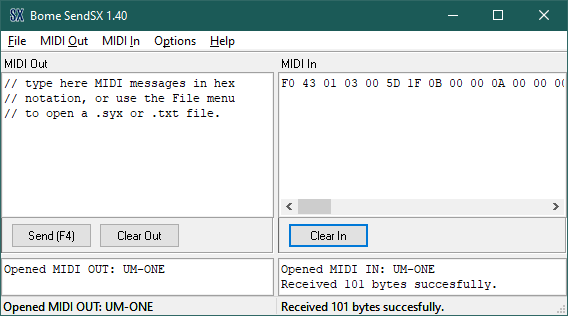
Back on your PC, open SendSX and, under Options, make sure that MIDI Thru is unchecked.
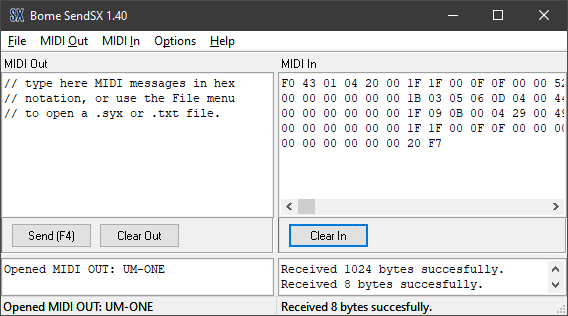
Click the Clear In button to erase any data in the IN window.
The Midi In pane should be empty and SendSX is ready to receive data.
Step 5: Transmit Your Patches
While the screen reads Midi Transmit? on your DX100, press the +1 Yes button to transmit your data to the PC.
And don’t touch anything else on your DX! You will now see a bunch of hex values in the Midi In pane in SendSX and a success message.
Step 6: Save the Data on Your PC
From the SendSX File menu chose Save Midi In to save your patches on your computer as a .SYX file (or TXT if you want).
Saving a Single Patch to PC
Saving a single patch is a little easier. The simple act of switching patches instantly transmits that patch’s sysex info over MIDI. Just make sure to follow steps 1–2 above to turn on Sys.Info:on. Detailed steps are as follows:
Step 1: Locate Your Patch
On your DX100 find the patch you want to save. It can be any of the 192 factory patches or any of 24 user-programmed internal slots. Let’s say I want to save internal patch 14. I press internal then button 14.
Step 2: Set up SendSX to Receive Data
Same as Step 4 above. Open SendSX your your PC and click the Clear In button and insure MIDI Thru is disabled
Step 3: Transmit Your Patch’s Data
Press just the number key of your chosen patch again. In my example, I’d press button 14 again. As before, don’t touch anything else on your DX after hitting the number button!
You should now see a bunch of hex values in the Midi In pane in SendSX and a success message. The hex string should be shorter than before (around 101 bytes).
Step 4: Save Your .SYX File
From the SendSX FILE menu chose Save Midi In to save your patch on your computer as a .SYX file as you did with the complete bank save.
Transferring a Set of Patches from your PC to the DX100
Transferring patches from your PC to your DX100 is also handled by SendSX.
Step 1: Prepare SendSX for the Transfer
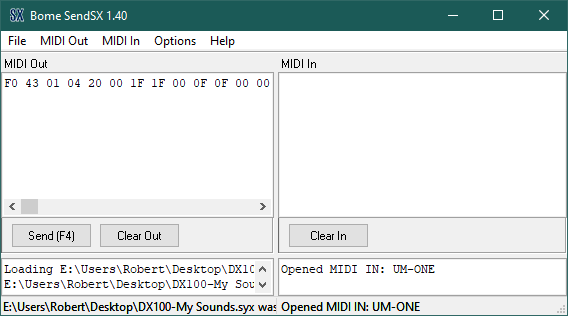
Open SendSX and click the Clear Out button to erase the contents of the Midi Out pane.
Go to File then Open to find and open your saved .SYX file.
Opening the file will populate the Midi Out pane with hex values.
Step 2: Turn Off Memory Protection on the DX100
On your DX we need to turn offMemory Protection mode by pressing the brown Function button and then the Memory Protect button (number 12) .
The screen will probably read M.Protect:on. Switch this to off by pressing the -1 No Key.
It should now read M.Protect:off. From this point on be careful because, with memory protection off, it is possible to delete or alter saved patches.
Step 3: Transmit Your Patches
In SendSX click the Send(F4) button. It doesn’t matter what you are doing on the synthesizer. If memory protection is off, the Internal patch bank will be replaced with the saved sysex data.
Step 4: Turn Memory Protection Back On
Turn Memory Protection back on to prevent an accidental erasing of patches. Press Function then Memory Protect then +1 Yes to reenable it.
And Finally… Loading a Single Patch to the DX100
Follow the steps 1–2 above to load your single patch into SendSX and turn off Memory Protection on the DX.
Step 3: Select Your Patch Location
Get your DX100 ready to receive data by selecting the internal patch location that you want to overwrite. Press Internal button then any of the 24 number buttons.
Step 4: Transmit the Data From SendSX
In SendSX click the Send(F4) button. The DX will now have the patch loaded and selected in the slot location from the previous step. If you play the keyboard you will hear your loaded patch, but…
Step 5: Save Your New Patch on the DX100
Your patch will not be saved just yet. If you switch to another patch, the sysex loaded patch will vanish from memory! You need to save the patch in the same manner you would save any edited sound.
Press Function button then the reddish Store button and select the internal slot in which you want the patch saved. This will probably be the same number that you selected in step #4.
For example the screen will say Mem Store 2→?. Press the Number 2 button and the patch will be saved in internal slot #2.
Note: You don’t necessarily need to be in Function mode to save a sound. You just want to be sure you are not in Edit mode because then the Store button becomes the EG Copy button.
Step 6: Turn Memory Protection Back On
Turn Memory Protection back on to prevent an accidental erasing of patches. Press Function then Memory Protect then +1 Yes to reenable it.
In Conclusion…
Well, that was a lot of info. Trust me it’s not that difficult. I just like to break tutorials up into very detailed steps to make sure you understand everything you are doing. Now if you want to download some of my custom DX100 patches download the .ZIP below which contains all the sounds from this post as both a complete 24 patch bank and 24 individual patches.
Here is some time-lapse footage of me cutting my latest wood engraving. See more exciting content like this on my Instagram account. (Music by Jimmy Riddle)