Transferring Patches to a Yamaha DX100 with Sysex and a PC
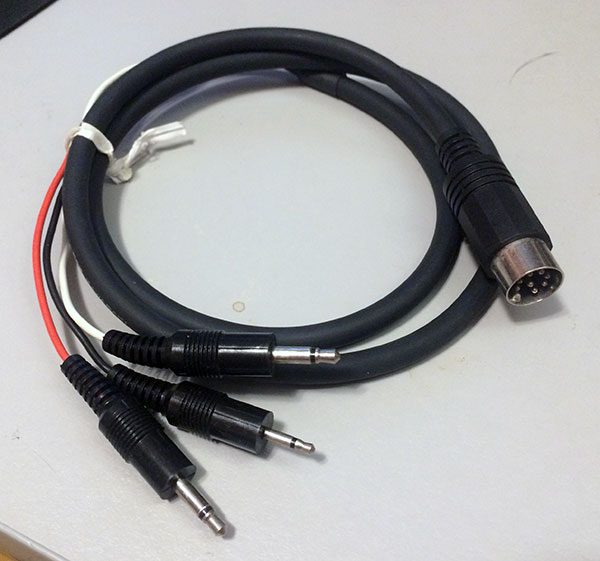
On this site, I had previously posted a set of 24 Yamaha DX100 synth patches for download. The DX is a notoriously difficult synthesizer to program. That difficulty extends to its load/save workflow as well. Originally, the DX100 came with a special cord with a MIDI-style plug on one end and three headphone-sized jacks on the other. This is meant to be plugged into a data cassette recorder. The red cable is audio out, the white is audio in, and the black (I assume) controls the tape player. You hit a button combo on the DX100 and then a screeching modem sound is output to the tape. Modern users can record this sound on a computer as a .WAV file and it will work the same as and old-school tape deck. This works okay, but there is a better way to archive and reload sounds.
Meet Sysex
Sysex stands for system exclusive and it’s a part of the MIDI standard that allows synth manufacturers to define their own specific message formats. In our case it is useful because the DX100 uses sysex to store and retrieve patches. With some free software and a cheap hardware interface, you can easily store and retrieve synth sounds on your PC as both individual patches and a complete 24 patch bank.
Requirements
A Yamaha DX100 Synthesizer
A DX27 should also use the same data, but I have not tested that.
A MIDI Interface
I opted to go the cheapest possible route and bought a Roland UM-One from Sweetwater. This cable is a USB connector on one end and MIDI In/Out on the other.
Connect your DX to the PC and all the sudden you can control VSTs with the DX or send sequences from your favorite DAW to the synth. I have Windows 10, and this worked perfectly with no special set up or drivers needed.
Bome SendSX
This is a tiny, powerful software utility that does two things. It reads and sends sysex data. You can actually see the data flowing in as you play the keyboard. Your playing is translated into beautiful hex values instantaneously. Download Bome SendSx for free!
Saving All Your Patches at Once to PC
On the Yamaha DX100 user patches are saved in the Internal bank of 24 patches. These are typically accessed by pressing the internal button and then any of the 24 green numbered buttons. To save all 24 of these patches at once do the following:
Step 1: Connect The Hardware
Connect your DX100 to the PC using the MIDI interface
Step 2: Enable Sysex
On your DX100 press the brown Function/Compare button.![]() You’ll know you are in function mode because there will be an uppercase F in the left side of the screen. When function mode is enabled, the number buttons correlate the function listed in below each button.
You’ll know you are in function mode because there will be an uppercase F in the left side of the screen. When function mode is enabled, the number buttons correlate the function listed in below each button.
Press the Sys Info key (green key #5).

The screen should say Sys.Info:on. If it is set to off, press the +1 Yes key to turn it on.

I think it’s pretty safe to just always leave this on.
Step 3: Get Ready to Transmit MIDI
Press the Sys Info key again until the screen displays Midi Transmit?
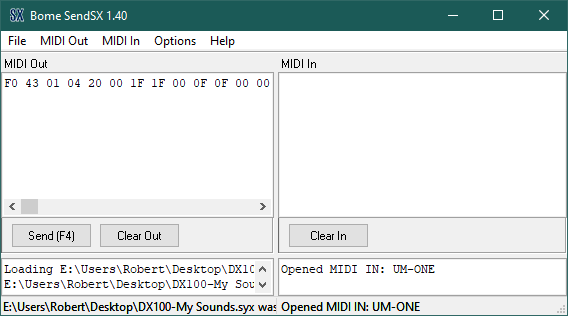
Step 4: Set up SendSX to Receive Data
Back on your PC, open SendSX and, under Options, make sure that MIDI Thru is unchecked.
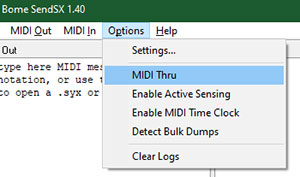
Click the Clear In button to erase any data in the IN window.
The Midi In pane should be empty and SendSX is ready to receive data.
Step 5: Transmit Your Patches
While the screen reads Midi Transmit? on your DX100, press the +1 Yes button to transmit your data to the PC.
And don’t touch anything else on your DX! You will now see a bunch of hex values in the Midi In pane in SendSX and a success message.
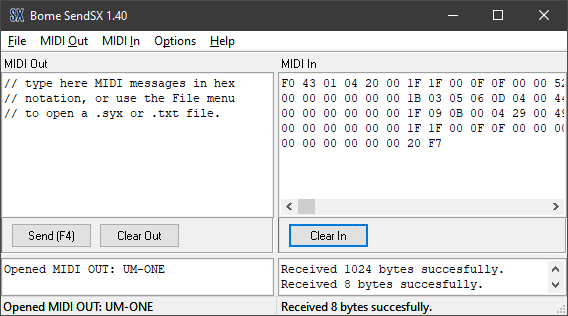
Step 6: Save the Data on Your PC
From the SendSX File menu chose Save Midi In to save your patches on your computer as a .SYX file (or TXT if you want).
Saving a Single Patch to PC
Saving a single patch is a little easier. The simple act of switching patches instantly transmits that patch’s sysex info over MIDI. Just make sure to follow steps 1–2 above to turn on Sys.Info:on. Detailed steps are as follows:
Step 1: Locate Your Patch
On your DX100 find the patch you want to save. It can be any of the 192 factory patches or any of 24 user-programmed internal slots. Let’s say I want to save internal patch 14. I press internal then button 14.
Step 2: Set up SendSX to Receive Data
Same as Step 4 above. Open SendSX your your PC and click the Clear In button and insure MIDI Thru is disabled
Step 3: Transmit Your Patch’s Data
Press just the number key of your chosen patch again. In my example, I’d press button 14 again. As before, don’t touch anything else on your DX after hitting the number button!
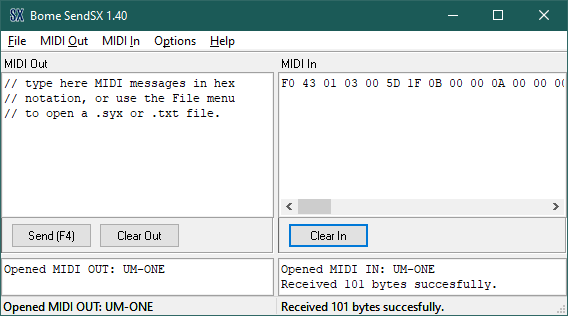
You should now see a bunch of hex values in the Midi In pane in SendSX and a success message. The hex string should be shorter than before (around 101 bytes).
Step 4: Save Your .SYX File
From the SendSX FILE menu chose Save Midi In to save your patch on your computer as a .SYX file as you did with the complete bank save.
Transferring a Set of Patches from your PC to the DX100
Transferring patches from your PC to your DX100 is also handled by SendSX.
Step 1: Prepare SendSX for the Transfer
Open SendSX and click the Clear Out button to erase the contents of the Midi Out pane.
Go to File then Open to find and open your saved .SYX file.
Opening the file will populate the Midi Out pane with hex values.
Step 2: Turn Off Memory Protection on the DX100
On your DX we need to turn off Memory Protection mode by pressing the brown Function button![]() and then the Memory Protect button (number 12) .
and then the Memory Protect button (number 12) .

The screen will probably read M.Protect:on. Switch this to off by pressing the -1 No Key.

It should now read M.Protect:off. From this point on be careful because, with memory protection off, it is possible to delete or alter saved patches.
Step 3: Transmit Your Patches
In SendSX click the Send(F4) button. It doesn’t matter what you are doing on the synthesizer. If memory protection is off, the Internal patch bank will be replaced with the saved sysex data.
Step 4: Turn Memory Protection Back On
Turn Memory Protection back on to prevent an accidental erasing of patches. Press Function then Memory Protect then +1 Yes to reenable it.
And Finally… Loading a Single Patch to the DX100
Follow the steps 1–2 above to load your single patch into SendSX and turn off Memory Protection on the DX.
Step 3: Select Your Patch Location
Get your DX100 ready to receive data by selecting the internal patch location that you want to overwrite. Press Internal button then any of the 24 number buttons.
Step 4: Transmit the Data From SendSX
In SendSX click the Send(F4) button. The DX will now have the patch loaded and selected in the slot location from the previous step. If you play the keyboard you will hear your loaded patch, but…
Step 5: Save Your New Patch on the DX100
Your patch will not be saved just yet. If you switch to another patch, the sysex loaded patch will vanish from memory! You need to save the patch in the same manner you would save any edited sound.
Press Function button then the reddish Store button ![]() and select the internal slot in which you want the patch saved. This will probably be the same number that you selected in step #4.
and select the internal slot in which you want the patch saved. This will probably be the same number that you selected in step #4.
For example the screen will say Mem Store 2→?. Press the Number 2 button and the patch will be saved in internal slot #2.
Note: You don’t necessarily need to be in Function mode to save a sound. You just want to be sure you are not in Edit mode because then the Store button becomes the EG Copy button.
Step 6: Turn Memory Protection Back On
Turn Memory Protection back on to prevent an accidental erasing of patches. Press Function then Memory Protect then +1 Yes to reenable it.
In Conclusion…
Well, that was a lot of info. Trust me it’s not that difficult. I just like to break tutorials up into very detailed steps to make sure you understand everything you are doing. Now if you want to download some of my custom DX100 patches download the .ZIP below which contains all the sounds from this post as both a complete 24 patch bank and 24 individual patches.
Amazing! Thanks for posting this. My DX100 needs a refresh as the previous owner saved the same patches in numerous places for some reason and I would like to get back to the way it started life.
Thanks. There is also a hidden factory reset function, While holding down 1 and 2 buttons, power ON the unit. Hit “No” for “test entry” question and follow the prompts on the screen.
Thank you for this tutorial. I can load a bank, but it will not save. Am I missing a step or perhaps it’s a battery issue. What do you think?
It might be the battery, but I would first make sure you properly turn Memory Protection off.
hi there
i’ve been trying with Librarian on Mac but I always have this message from the DX “MIDI BLUFFER FULL”
Is there a way to do it on MAC ?
I’m not a Mac person, but by initial googling had one result that said to make sure to connect both MIDI in and out to your computer when transferring? May also be an issue with the info being transmitted too fast. Sorry, I’m not much help here.